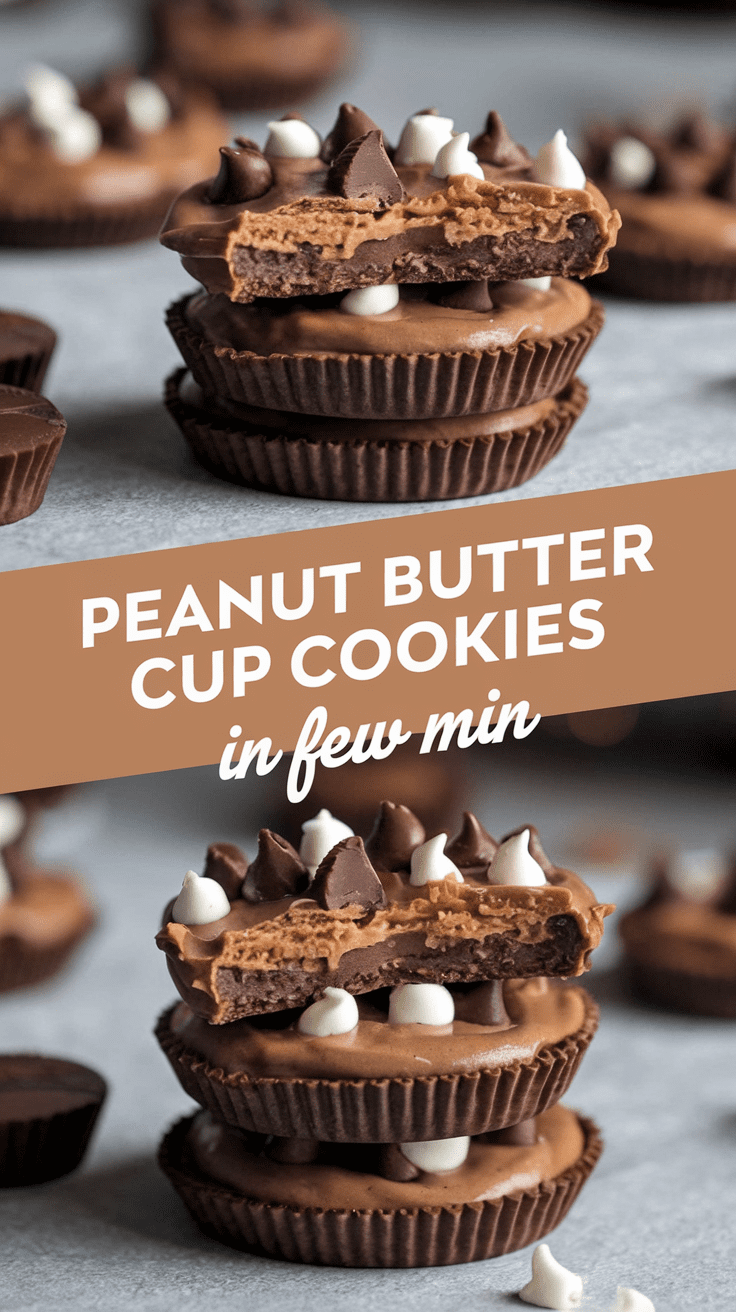
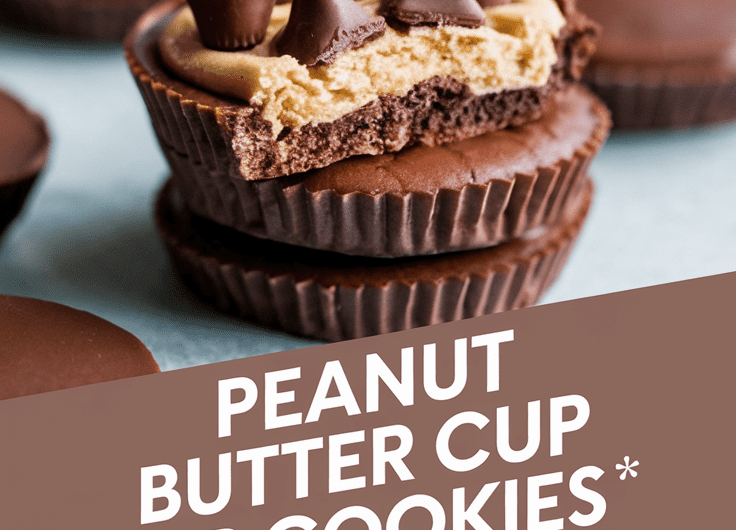
I’ll be honest with you right from the start—I think these peanut butter cup cookies are one of the most dangerously irresistible treats you can bake at home. Every time I make them, I tell myself I’ll save a batch for later, and then suddenly half the tray is gone. If you love soft cookies, warm peanut butter, and chocolate that melts just enough to make your heart happy, you’re in for something special.
These cookies are basically a mash-up of everything good: a tender peanut butter cookie base baked just enough to stay soft, plus a mini peanut butter cup placed right in the center while the cookie is still warm. The chocolate melts, settles, and creates that shiny, perfect bite. It’s simple, nostalgic, and ridiculously satisfying.
What makes this recipe special is how easy and quick it is. You don’t need fancy equipment, and the dough comes together fast. These cookies are also a crowd-pleaser—kids love them, adults love them, and you’ll probably have trouble stopping yourself from grabbing “just one more.”
Why You’ll Love This Recipe
- Soft, melt-in-your-mouth peanut butter flavor paired with creamy chocolate cups
- Perfect for holidays, gifting, parties, or late-night cravings
- Simple ingredients and easy steps, even if you’re new to baking
- No chilling required, so you get cookies on the table fast
- Customizable with add-ins, toppings, or flavored cups
- Portable, pretty, and freezer-friendly
Tools You’ll Need
Here’s everything that helps make the process smooth and stress-free, along with why you’ll want it in front of you.
- Muffin tin (mini, 24-cup): Helps the cookies hold that classic shape and hugs the peanut butter cup as it melts.
- Mixing bowls (medium and large): You’ll use one for dry ingredients and one for the wet mixture.
- Hand mixer or whisk: A hand mixer makes creaming the butter and sugar easier, but a whisk works if you don’t mind a little elbow action.
- Rubber spatula: Great for folding ingredients without overmixing.
- Measuring cups and spoons: Accurate measurements keep the cookies soft and balanced.
- Cooling rack: Cooling the cookies on a rack keeps them from steaming and turning soggy.
Ingredients
(US + metric so you can bake however you prefer)
Dry Ingredients
- 1 1/4 cups (155 g) all-purpose flour
- 1/2 tsp baking soda
- 1/2 tsp salt
Wet Ingredients
- 1/2 cup (113 g) unsalted butter, softened
- 1/2 cup (100 g) granulated sugar
- 1/2 cup (110 g) packed brown sugar
- 1/2 cup (130 g) creamy peanut butter
- 1 large egg
- 1 tsp vanilla extract
Add-ins
- 24 mini peanut butter cups (unwrapped)
Step-by-Step Instructions
1. Preheat and Prep
Set your oven to 350°F (175°C). Lightly grease your mini muffin tin or use mini liners if you prefer easy cleanup. I like greasing it because it gives smoother sides.
2. Mix the Dry Ingredients
In a medium bowl, whisk together flour, baking soda, and salt. This helps the leavening evenly distribute so you don’t get any weird pockets.
3. Cream the Butter and Sugars
In a large bowl, beat the softened butter, granulated sugar, and brown sugar until they’re light and creamy. This takes about 1–2 minutes. You’ll see the mixture get fluffy—this is what makes your cookies tender.
4. Add Peanut Butter, Egg, and Vanilla
Mix in the peanut butter until smooth. Add the egg and vanilla, beating just until combined. Don’t overmix; the dough should look thick and soft.
5. Add the Dry Ingredients
Use a spatula to fold the dry mixture into the wet mixture. The dough will feel soft but should hold its shape when rolled. If it feels sticky, that’s normal—you can chill it for 10 minutes, but you don’t have to.
6. Shape the Dough
Roll the dough into 1-inch (2.5 cm) balls and place one into each muffin cup. They don’t need to be flattened; the oven will handle that for you.
7. Bake
Bake for 8–10 minutes. You want the tops to look set, not browned. If they brown, they’ll get crispier than ideal.
8. Add the Peanut Butter Cups
Once the cookies come out of the oven, press one peanut butter cup into the center of each cookie while they’re still hot. The chocolate will soften beautifully. Let the cookies cool for about 10 minutes in the pan before moving them to a rack.
9. Cool Completely
Let the cookies finish cooling on the rack. The chocolate will firm up again as it cools—if you’re impatient like me, you might not wait that long.
Serving Ideas
- Serve them warm with a cold glass of milk
- Crumble them over vanilla ice cream
- Pack them in holiday tins for gifting
- Use them as part of a cookie platter
Variations and Customizations
- Use dark chocolate or white chocolate peanut butter cups
- Swap creamy peanut butter for crunchy for added texture
- Add chopped peanuts into the dough
- Drizzle with melted chocolate after cooling
- Add a pinch of cinnamon to the dough for warmth
Make-Ahead and Storage
- Store at room temperature for 4–5 days in an airtight container
- Freeze baked cookies for up to 2 months
- Freeze dough balls (without the cups) for easy baking later
- If freezing dough, bake directly from frozen and add 1–2 minutes
Pro Tips (and Mistakes to Avoid)
- Cream the butter and sugars well—this is what makes the cookies soft
- Don’t overbake; they should look pale
- Add the peanut butter cups immediately after baking
- Let them cool in the pan long enough so they don’t collapse
- If cups melt too much, chill the pan for a few minutes
Recipe Information
- Yield: 24 cookies
- Prep time: 15 minutes
- Cook time: 10 minutes
- Total time: 25 minutes
Nutrition (per cookie)
Approx. 140 calories · 7g fat · 16g carbs · 2g protein
Final Thoughts
I hope you make these peanut butter cup cookies soon—you’ll be amazed at how something so simple can taste so good. If you try them, I’d love to hear how they turned out. Share a picture, send them to someone you love, or tweak the recipe and make it your own. Happy baking!
Peanut Butter Cup Cookies
4
servings15
minutes10
minutes140
kcalThese cookies are basically a mash-up of everything good: a tender peanut butter cookie base baked just enough to stay soft, plus a mini peanut butter cup placed right in the center while the cookie is still warm. The chocolate melts, settles, and creates that shiny, perfect bite. It’s simple, nostalgic, and ridiculously satisfying.
Ingredients
1 1/4 cups (155 g) all-purpose flour
1/2 tsp baking soda
1/2 tsp salt
Wet Ingredients
1/2 cup (113 g) unsalted butter, softened
1/2 cup (100 g) granulated sugar
1/2 cup (110 g) packed brown sugar
1/2 cup (130 g) creamy peanut butter
1 large egg
1 tsp vanilla extract
Add-ins
24 mini peanut butter cups (unwrapped)
Directions
- Preheat and Prep
- Set your oven to 350°F (175°C). Lightly grease your mini muffin tin or use mini liners if you prefer easy cleanup. I like greasing it because it gives smoother sides.
- Mix the Dry Ingredients
- In a medium bowl, whisk together flour, baking soda, and salt. This helps the leavening evenly distribute so you don’t get any weird pockets.
- Cream the Butter and Sugars
- In a large bowl, beat the softened butter, granulated sugar, and brown sugar until they’re light and creamy. This takes about 1–2 minutes. You’ll see the mixture get fluffy—this is what makes your cookies tender.
- Add Peanut Butter, Egg, and Vanilla
- Mix in the peanut butter until smooth. Add the egg and vanilla, beating just until combined. Don’t overmix; the dough should look thick and soft.
- Add the Dry Ingredients
- Use a spatula to fold the dry mixture into the wet mixture. The dough will feel soft but should hold its shape when rolled. If it feels sticky, that’s normal—you can chill it for 10 minutes, but you don’t have to.
- Shape the Dough
- Roll the dough into 1-inch (2.5 cm) balls and place one into each muffin cup. They don’t need to be flattened; the oven will handle that for you.
- Bake
- Bake for 8–10 minutes. You want the tops to look set, not browned. If they brown, they’ll get crispier than ideal.
- Add the Peanut Butter Cups
- Once the cookies come out of the oven, press one peanut butter cup into the center of each cookie while they’re still hot. The chocolate will soften beautifully. Let the cookies cool for about 10 minutes in the pan before moving them to a rack.
- Cool Completely
- Let the cookies finish cooling on the rack. The chocolate will firm up again as it cools—if you’re impatient like me, you might not wait that long.
Notes
- Cream the butter and sugars well—this is what makes the cookies soft
Don’t overbake; they should look pale
Add the peanut butter cups immediately after baking
Let them cool in the pan long enough so they don’t collapse
If cups melt too much, chill the pan for a few minutes