Desserts that roll always have a certain enchantment about them, and even more so when chocolate and Oreos are part of the ingredients. I vividly recall the first time I prepared the Oreo Cream Chocolate Roll; I cut the soft, fudgy sponge cake and admired the swirl of light Oreo cream inside. It was just like a treat from a bakery, but on the other hand, it was surprisingly easy to make at home. The taste was so delicious that you could easily close your eyes and get lost in the rich cocoa surrounded by the good old cookies-and-cream sweetness.
What Is an Oreo Cream Chocolate Roll?
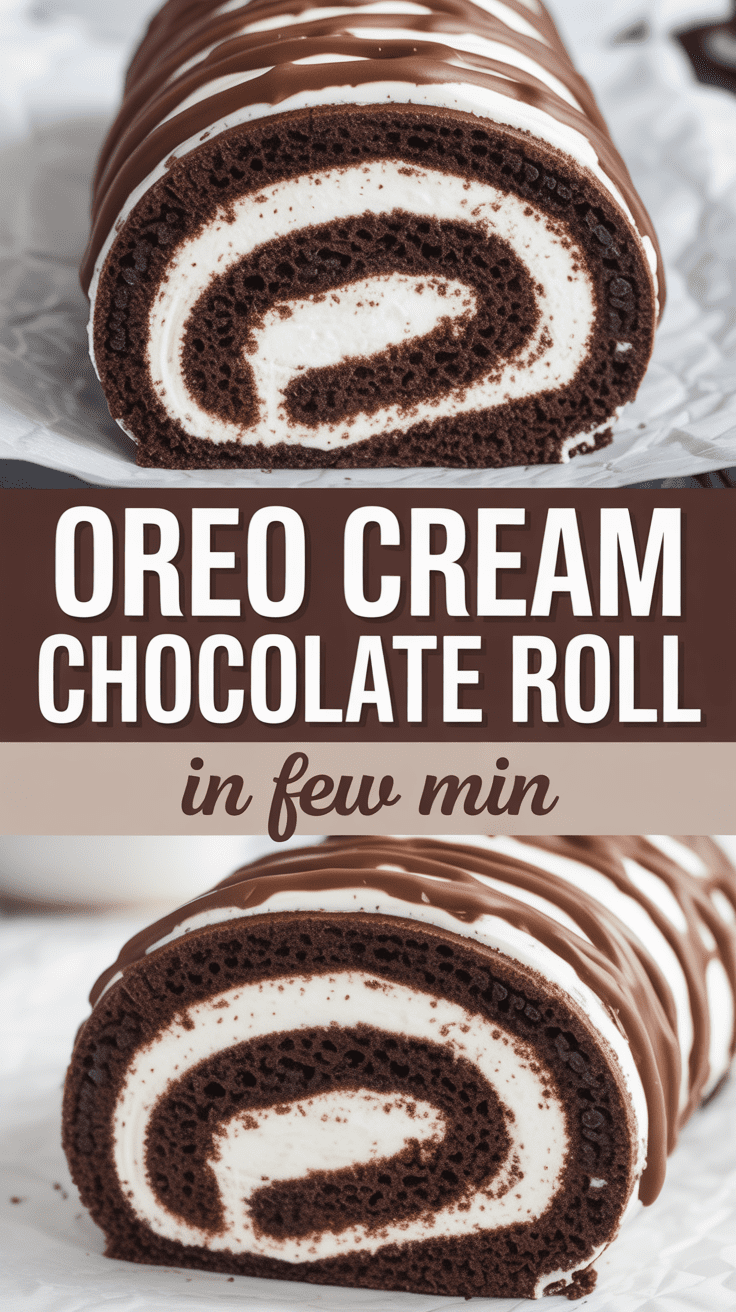
The Oreo Cream Chocolate Roll is nothing but a delectable combination of soft, chocolate-flavored sponge cake rolled with a creamy filling of Oreo inside. One can say it is a type of Swiss roll, but with an addition of cookies-and-cream twist. The cake part is very airy and light, the cream is very rich, and this combination of textures makes it almost impossible to resist having just one slice. It can be served on birthdays, Christmas, or whenever one wants to surprise friends or family without spending the whole day in the kitchen.
Why This Recipe Is Special
Recipe is coming up with one secret, that is its balance – and it is not too sweet either. Sponge cake is so soft that it is made without butter, and no oil is used either; hence, it is fluffy and creamy but not greasy filling. Oreos give not just the flavor and iconic taste but also the crunch. Furthermore, it is one of those desserts that looks like it took countless hours to make but can actually be whipped up in about an hour, including the cooling time.
Why You’ll Love This Recipe
- Rich and creamy – The Oreo filling gives you that perfect cookies-and-cream flavor.
- Easy to make – You don’t need any fancy tools or baking experience.
- Looks impressive – That swirl inside will make everyone think you’re a pro baker.
- Make-ahead friendly – You can prepare it the night before and chill it until serving.
- Kid and crowd favorite – Everyone loves Oreos, and this dessert never disappoints.
Tools You’ll Need
Here’s what you’ll want on hand before we start:
- Mixing bowls (2–3) – For separating wet and dry ingredients.
- Electric mixer or whisk – Helps achieve that airy, fluffy cake texture.
- Rubber spatula – Great for folding the batter without deflating it.
- Baking sheet (10×15 inch / 25×38 cm) – The perfect size for a jelly roll cake.
- Parchment paper – Prevents sticking and makes rolling easier.
- Clean kitchen towel – You’ll use this to roll the cake while it’s warm.
- Cooling rack – To help the cake cool evenly.
Ingredients
For the Chocolate Sponge Cake
- 4 large eggs, room temperature
- ¾ cup (150 g) granulated sugar
- ½ cup (65 g) all-purpose flour
- ¼ cup (25 g) unsweetened cocoa powder
- 1 teaspoon baking powder
- ¼ teaspoon salt
- 1 teaspoon vanilla extract
For the Oreo Cream Filling
- 1 cup (240 ml) heavy cream, chilled
- ½ cup (120 g) cream cheese, softened
- ¼ cup (30 g) powdered sugar
- 1 teaspoon vanilla extract
- 6 Oreo cookies, crushed
Optional Garnish
- Crushed Oreos for topping
- Melted chocolate drizzle
- Whipped cream swirls
Step-by-Step Instructions
Step 1: Preheat and Prepare
Preheat your oven to 350°F (175°C). Line your baking sheet with parchment paper and make sure its size is a bit bigger than that of the sheet—it will be easier to take the cake out later.
Step 2: Beat the Eggs and Sugar
In a large bowl, the eggs and sugar should be beaten using a whisk for about 4–5 minutes until they become light and fluffy. Personally, I prefer an electric mixer for this process as it greatly increases the volume of the sponge, making it very airy.
Step 3: Sift and Fold
Sift the flour, cocoa powder, baking powder, and salt together. With a spatula, implement a very delicate folding of the dry constituents into the egg mixture. This is a critical step—if it’s done too much, the batter will lose its aeration. Add vanilla extract and fold just until combined.
Step 4: Bake the Sponge
Spread out the batter in the pan that you have prepared, and even out the top with a spatula. Bake for 10–12 minutes, when the cake is done, it should be bouncy when touched lightly. Don’t let it bake for too long—it should still be soft and flexible.
Step 5: Roll It While Warm
The moment it is out of the oven, put the cake on a kitchen towel that has been dusted with powdered sugar. With care, take off the parchment paper, then slowly roll the cake up with the towel in it. This is the moment when the cake “learns” its shape of being rolled. Let it cool completely while rolled.
Step 6: Make the Oreo Cream
Cream cheese and powdered sugar should be beaten until smooth in a bowl. Add vanilla and mix again. In another bowl, heavy cream should be whipped until stiff peaks are formed. Then, whipped cream should be folded into the cream cheese mixture, and crushed Oreos should be stirred in. The filling should be both thick and fluffy.
Step 7: Fill and Roll
When the cake is sufficiently cooled down, carefully unwrap it. Cream the Oreo filling over the entire surface, but be sure to leave a margin of about an inch at the edges. Then, gently roll it up again, but this time without the towel. Wrap it with plastic wrap and refrigerate for a minimum of 1 hour.
Step 8: Slice and Serve
Once chilled, unwrap and place the roll on a serving plate. Dust with powdered sugar, drizzle melted chocolate, or top with whipped cream and more Oreos. Slice with a sharp knife and serve chilled.
Serving Ideas
- Serve it chilled along with a glass of cold milk or a cappuccino.
- Furthermore, place a scoop of vanilla ice cream on top for an additional dessert.
- If there are any important events, then treat with chocolate ganache and crushed Oreos on the top.
Variations and Customizations
- Mint Oreo Roll – Just put a few drops of mint extract in the filling, and Mint Oreos will be used.
- Mocha Twist – Instant espresso powder is mixed with the sponge batter by a teaspoon.
- Strawberry Delight – Half of the Oreos are replaced with freeze-dried strawberries, which are crushed for a fruity kick.
- Gluten-Free Version – Replace the flour with a gluten-free blend and sandwich cookies made without gluten.
Storage and Make-Ahead Tips
- Fridge: Up to 4 days if stored in an airtight container.
- Freezer: Tighten the wrap with plastic wrap and foil. Keep it frozen for a maximum of 1 month. Move to the fridge to thaw overnight.
- Make-Ahead: Sponge baking can be done a day in advance, rolling (without filling), then wrapping for room temperature storage. Assembling the filling can be done the next day.
Pro Tips and Mistakes to Avoid
Here are the little secrets I’ve learned after making this recipe many times:
- Absolutely do not omit the warm rolling process. If you wait too long, the cake might split.
- You must whip your eggs correctly. This gives the cake a light and airy structure.
- Cream should be cold. If the cream is warm, then it will not be whipped properly.
- Do not stir; fold instead. The batter remains light and fluffy when done with gentle folding.
- It must chill. Chilling before cutting the roll helps it set, and also the filling stays firm.
Recipe Info
- Yield: 8–10 slices
- Prep Time: 20 minutes
- Cook Time: 12 minutes
- Total Time: 1 hour 30 minutes (includes chilling)
Nutrition (per slice, approx.)
Calories: 270
Fat: 16g
Carbohydrates: 28g
Protein: 5g
Final Thoughts
When one craves for something that seems to be rich in taste and at the same time soothing, then this Oreo Cream Chocolate Roll is the right choice. It’s just like one of the desserts that makes you smile even before taking a bite. Each slice is a celebration—soft, creamy, and nostalgic all at once.

Oreo Cream Chocolate Roll
4
servings20
minutes12
minutes270
kcalThe Oreo Cream Chocolate Roll is nothing but a delectable combination of soft, chocolate-flavored sponge cake rolled with a creamy filling of Oreo inside. One can say it is a type of Swiss roll, but with an addition of cookies-and-cream twist. The cake part is very airy and light, the cream is very rich, and this combination of textures makes it almost impossible to resist having just one slice. It can be served on birthdays, Christmas, or whenever one wants to surprise friends or family without spending the whole day in the kitchen.
Ingredients
For the Chocolate Sponge Cake
4 large eggs, room temperature
¾ cup (150 g) granulated sugar
½ cup (65 g) all-purpose flour
¼ cup (25 g) unsweetened cocoa powder
1 teaspoon baking powder
¼ teaspoon salt
1 teaspoon vanilla extract
For the Oreo Cream Filling
1 cup (240 ml) heavy cream, chilled
½ cup (120 g) cream cheese, softened
¼ cup (30 g) powdered sugar
1 teaspoon vanilla extract
6 Oreo cookies, crushed
Optional Garnish
Crushed Oreos for topping
Melted chocolate drizzle
Whipped cream swirls
Directions
- Step 1: Preheat and Prepare
- Preheat your oven to 350°F (175°C). Line your baking sheet with parchment paper and make sure its size is a bit bigger than that of the sheet—it will be easier to take the cake out later.
- Step 2: Beat the Eggs and Sugar
- In a large bowl, the eggs and sugar should be beaten using a whisk for about 4–5 minutes until they become light and fluffy. Personally, I prefer an electric mixer for this process as it greatly increases the volume of the sponge, making it very airy.
- Step 3: Sift and Fold
- Sift the flour, cocoa powder, baking powder, and salt together. With a spatula, implement a very delicate folding of the dry constituents into the egg mixture. This is a critical step—if it’s done too much, the batter will lose its aeration. Add vanilla extract and fold just until combined.
- Step 4: Bake the Sponge
- Spread out the batter in the pan that you have prepared, and even out the top with a spatula. Bake for 10–12 minutes, when the cake is done, it should be bouncy when touched lightly. Don’t let it bake for too long—it should still be soft and flexible.
- Step 5: Roll It While Warm
- The moment it is out of the oven, put the cake on a kitchen towel that has been dusted with powdered sugar. With care, take off the parchment paper, then slowly roll the cake up with the towel in it. This is the moment when the cake “learns” its shape of being rolled. Let it cool completely while rolled.
- Step 6: Make the Oreo Cream
- Cream cheese and powdered sugar should be beaten until smooth in a bowl. Add vanilla and mix again. In another bowl, heavy cream should be whipped until stiff peaks are formed. Then, whipped cream should be folded into the cream cheese mixture, and crushed Oreos should be stirred in. The filling should be both thick and fluffy.
- Step 7: Fill and Roll
- When the cake is sufficiently cooled down, carefully unwrap it. Cream the Oreo filling over the entire surface, but be sure to leave a margin of about an inch at the edges. Then, gently roll it up again, but this time without the towel. Wrap it with plastic wrap and refrigerate for a minimum of 1 hour.
- Step 8: Slice and Serve
- Once chilled, unwrap and place the roll on a serving plate. Dust with powdered sugar, drizzle melted chocolate, or top with whipped cream and more Oreos. Slice with a sharp knife and serve chilled.
Notes
- Absolutely do not omit the warm rolling process. If you wait too long, the cake might split.
You must whip your eggs correctly. This gives the cake a light and airy structure.
Cream should be cold. If the cream is warm, then it will not be whipped properly.
Do not stir; fold instead. The batter remains light and fluffy when done with gentle folding.
It must chill. Chilling before cutting the roll helps it set, and also the filling stays firm.