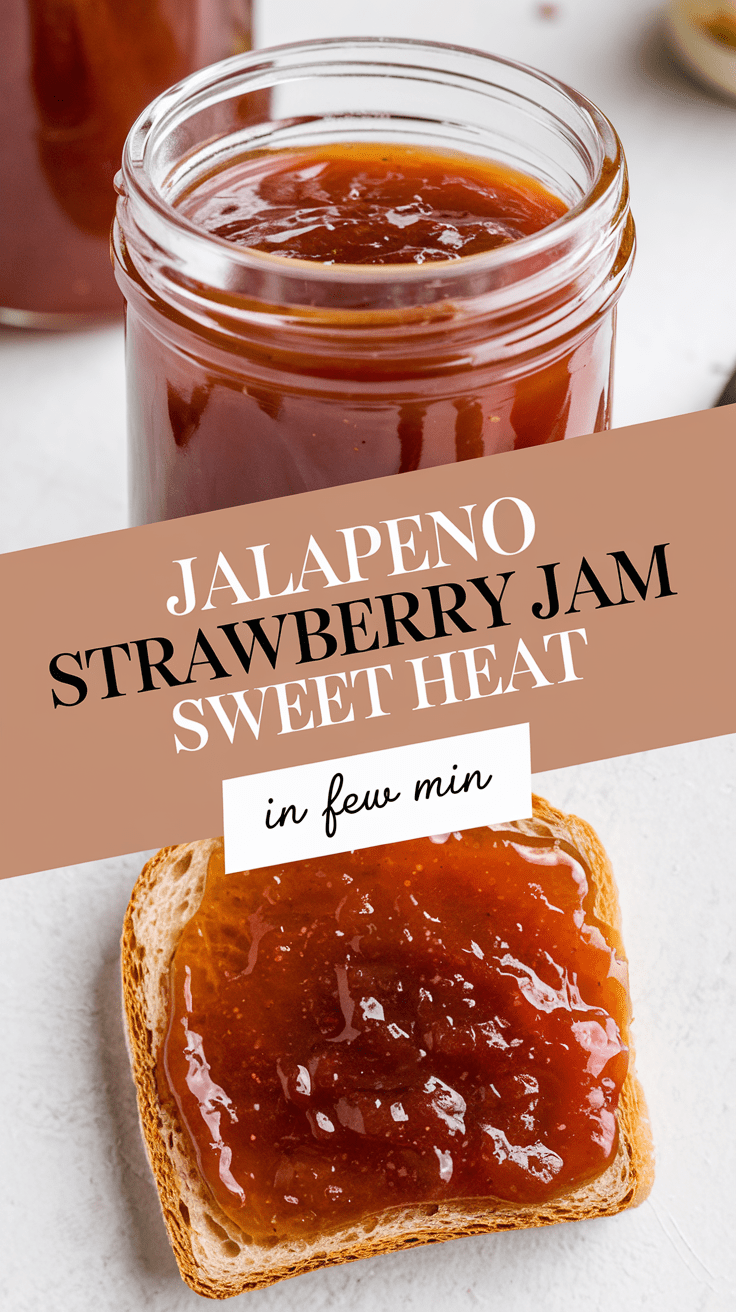
There’s something magical about a recipe that surprises you—and this Jalapeño Strawberry Jam does exactly that. I still remember the first time I made it; I expected a simple fruity jam, but what I got was a bold burst of sweetness followed by that sneaky, delightful kick of heat. It’s not your ordinary breakfast spread—it’s a flavor rollercoaster. You get the comfort of ripe strawberries and the excitement of jalapeños in one spoonful.
A Quick Introduction
This Jalapeño Strawberry Jam is the perfect balance between sweet and spicy. Picture a bit spread on hot buttered toast or used as a dipping sauce for sharp cheddar on a cheese board, the flavors sliding in perfect harmony. Though this is a small-batch recipe, it is one of those rare sweets that taste like it must have been made from some fancy artisanal shop. takes much time, but the results taste like something you’d buy at a fancy artisan market.
Why This Recipe Is Special
What sets this jam apart is the function the heat plays in enhancing the sweetness. The heat from the jalapeños doesn’t make it hot; the jalapeños make it interesting. Nobody mentions that you can change the heat level to your desire and that one ought to upgrade that Lancaster trip connection. All in all, it is homemade and has a lot of personality.
Why You’ll Love This Recipe
- Sweet with a kick – the delightful balance of flavors for intrigue-lovers.
- Customizable heat level – fixing the spice content is up to you.
- Cooked real quick – No pectin. No beastly canning method.
- Very welcoming – Use it over strawberry jam, on toast, biscuit, cheese, sausage, and even sandwiches off the grill.
- Impressive gift idea – people will think you bought it from a gourmet store.
Tools You’ll Need
Here’s everything you’ll want handy before you start—nothing fancy, just the essentials:
- Medium saucepan (2–3 qt / 2–3 L) – where all the flavor magic happens.
- Wooden spoon or heat-safe spatula – for stirring and preventing sticking.
- Sharp knife and cutting board – to finely dice the strawberries and jalapeños.
- Measuring cups and spoons – accuracy matters, especially for sugar ratios.
- Mason jars or heat-safe containers – for storing your jam once it cools.
- Candy thermometer (optional) – if you like precision and want to check for the perfect jam set.
Ingredients
Here’s what you’ll need for one small batch (makes about 2½ cups / 600 ml):
- 2 cups (400 g) fresh strawberries, hulled and finely chopped
- 1–2 jalapeños, finely diced (adjust for heat preference)
- 1½ cups (300 g) granulated sugar
- 2 tbsp (30 ml) lemon juice (freshly squeezed)
- 1 tsp lemon zest (optional, but brightens the flavor)
- 1 pinch of salt
Step-by-Step Instructions
1. Prep the Ingredients
Start by washing and hulling the strawberries. Dice them small so they break down faster while cooking. Do the same with the jalapeños—remove the seeds if you want mild heat or keep them for a stronger kick.
Tip: I usually wear gloves when chopping jalapeños because one accidental eye rub can ruin your day.
2. Combine and Cook
In your saucepan, add the strawberries, jalapeños, sugar, lemon juice, and salt. Give it a gentle stir and let it sit for about 10 minutes. This helps draw out the juices.
Turn the heat to medium and stir occasionally as the mixture begins to bubble. You’ll notice the strawberries softening and the color deepening to a gorgeous ruby red.
3. Simmer and Thicken
Once boiling, reduce heat to medium-low. Let it simmer uncovered for 20–25 minutes, stirring frequently. You’ll know it’s close when the mixture thickens and the bubbles get slower and glossier.
If you have a candy thermometer, you’re aiming for around 220°F (104°C)—that’s the “jam set” stage.
4. Check the Set
Here’s my favorite little trick: spoon a bit of jam onto a chilled plate and run your finger through it. If it leaves a clear path without running back together, you’ve nailed it. If not, give it another 5 minutes.
5. Cool and Store
Remove from heat and let it cool for about 10 minutes before transferring to clean jars. It’ll thicken more as it cools. Store in the fridge for up to 3 weeks—or freeze for longer.
Serving Ideas
This jam isn’t just for breakfast. Here’s how I love to use it:
- And smear this on cream cheese bagels for that sweet-heat morning hit.
- Put it on a charcuterie board with sharp cheddar or brie.
- Use it to glaze grilled chicken or pork chops.
- Mix a spoonful into Greek yogurt for a tangy, fiery zing.
- Drizzle over vanilla ice cream (trust me, it’s wild but works).
Variations and Customizations
- Get smokier: toss in a pinch of smoked paprika.
- More fruit: Add in diced peaches or raspberries for further complication.
- Want it to be thicker? Stir in 1 tbsp chia seeds after removing from heat.
- Milder: half a jalapeño or red chili flakes instead.
Storage and Make-Ahead Tips
- Refrigerator: Store in an airtight jar up to 3 weeks.
- Freezer: Pour into freezer-safe containers, leaving a little expansion room, and freeze for 6 months.
- Canning: If you know water bath canning, this jam is also shelf-stable up to 1 year.
Pro Tips & Mistakes to Avoid
Here are the little secrets I’ve learned after a few batches:
- Use ripe strawberries. Overripe berries make the jam too runny.
- Don’t rush the simmer. That slow bubbling is what creates the jammy texture.
- Taste before jarring. Adjust sweetness or heat while it’s still warm.
- Keep stirring. Sugar can burn easily at the bottom if left alone.
- Skip metal spoons for testing. They hold heat and can make you think the jam is thicker than it really is.
Recipe Notes
Yield: About 2½ cups (600 ml)
Prep Time: 10 minutes
Cook Time: 25 minutes
Total Time: 35 minutes
Serving Size: 1 tablespoon (15 g)
Estimated Nutrition (per serving):
Calories: 40 | Sugar: 9 g | Fat: 0 g | Fiber: 0.5 g | Protein: 0 g
Final Thoughts
If you’ve never made homemade jam before, this Jalapeño Strawberry Jam is the perfect place to start. It’s fun, quick, and the flavor payoff is out of this world. Once you taste that sweet-heat magic, you’ll start thinking of new ways to use it—maybe even gift jars to your friends (they’ll think you’re a kitchen genius).
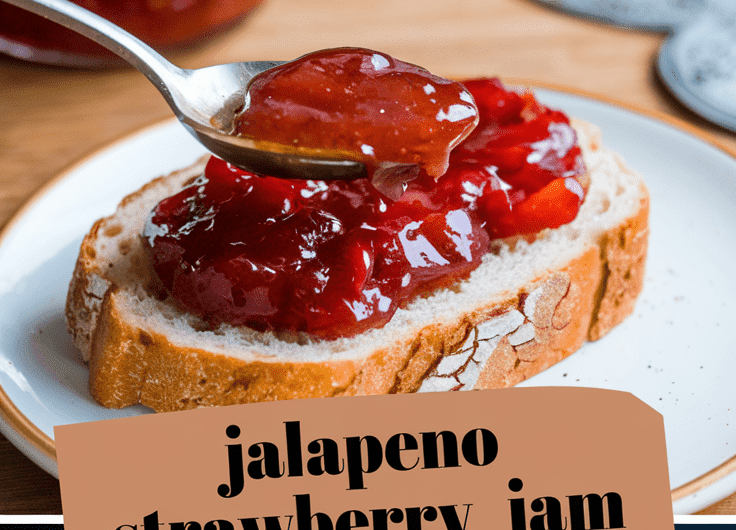
Jalapeño Strawberry Jam Sweet Heat
4
servings10
minutes25
minutes40
kcalThis Jalapeño Strawberry Jam is the perfect balance between sweet and spicy. Picture a bit spread on hot buttered toast or used as a dipping sauce for sharp cheddar on a cheese board, the flavors sliding in perfect harmony. Though this is a small-batch recipe, it is one of those rare sweets that taste like it must have been made from some fancy artisanal shop. takes much time, but the results taste like something you’d buy at a fancy artisan market.
Ingredients
2 cups (400 g) fresh strawberries, hulled and finely chopped
1–2 jalapeños, finely diced (adjust for heat preference)
1½ cups (300 g) granulated sugar
2 tbsp (30 ml) lemon juice (freshly squeezed)
1 tsp lemon zest (optional, but brightens the flavor)
1 pinch of salt
Directions
- Prep the Ingredients
- Start by washing and hulling the strawberries. Dice them small so they break down faster while cooking. Do the same with the jalapeños—remove the seeds if you want mild heat or keep them for a stronger kick.
- Tip: I usually wear gloves when chopping jalapeños because one accidental eye rub can ruin your day.
- Combine and Cook
- In your saucepan, add the strawberries, jalapeños, sugar, lemon juice, and salt. Give it a gentle stir and let it sit for about 10 minutes. This helps draw out the juices.
- Turn the heat to medium and stir occasionally as the mixture begins to bubble. You’ll notice the strawberries softening and the color deepening to a gorgeous ruby red.
- Simmer and Thicken
- Once boiling, reduce heat to medium-low. Let it simmer uncovered for 20–25 minutes, stirring frequently. You’ll know it’s close when the mixture thickens and the bubbles get slower and glossier.
- If you have a candy thermometer, you’re aiming for around 220°F (104°C)—that’s the “jam set” stage.
- Check the Set
- Here’s my favorite little trick: spoon a bit of jam onto a chilled plate and run your finger through it. If it leaves a clear path without running back together, you’ve nailed it. If not, give it another 5 minutes.
- Cool and Store
- Remove from heat and let it cool for about 10 minutes before transferring to clean jars. It’ll thicken more as it cools. Store in the fridge for up to 3 weeks—or freeze for longer.