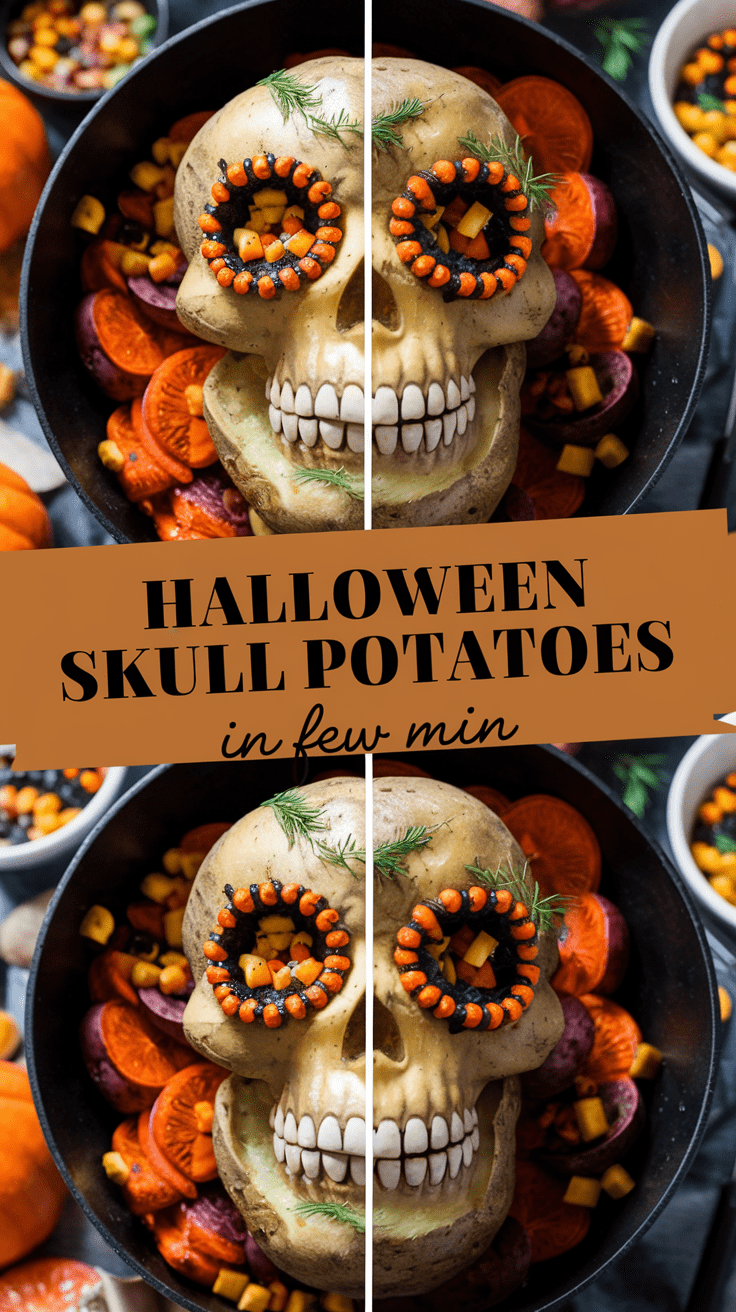
I’ve made a lot of spooky snacks over the years, but these Halloween Skull Potatoes might just be my favorite. There’s something about a tray of crispy, golden potatoes shaped like little skulls that instantly turns a simple side dish into the star of the Halloween table. Every time I make them, people can’t help but smile—and then grab another one.
These are basically mashed potatoes in disguise—fluffy inside, crispy outside, and just creepy enough to fit the theme. You mold them in a skull-shaped silicone tray (the kind made for baking or candy), bake them until they’re golden, and boom—you’ve got edible skulls that are equal parts eerie and irresistible.
What makes this recipe so special is how unexpectedly good they taste. You’d think they’re just for fun, but they’re seriously delicious—rich, buttery, garlicky, and customizable in so many ways. They also make a perfect party dish because you can prep them ahead of time, pop them in the oven before guests arrive, and watch everyone’s faces light up when they see them.
Why You’ll Love This Recipe
- Spooky and fun: Perfect for Halloween parties or movie nights.
- Simple ingredients: Just potatoes, butter, milk, and a few spices.
- Make-ahead friendly: You can prep the mashed mixture the day before.
- Crispy outside, creamy inside: The best texture combo ever.
- Kid and adult approved: Fun for kids, tasty enough for grown-ups.
Tools You’ll Need
- Skull-shaped silicone mold: This is the key! It gives the potatoes their shape and makes removal easy. (You can find these online or in Halloween baking aisles.)
- Potato masher or ricer: For smooth, lump-free potatoes.
- Mixing bowl: To combine all the ingredients.
- Baking sheet: To support the silicone mold in the oven.
- Small spatula or spoon: For pressing the mixture into the molds evenly.
Ingredients
(Makes about 12 skulls)
- 2 pounds (900 g) russet potatoes, peeled and cubed
- 4 tablespoons (60 g) unsalted butter
- 1/2 cup (120 ml) milk (whole milk gives the best texture)
- 2 cloves garlic, minced (optional but so worth it)
- 1/2 teaspoon salt, or to taste
- 1/4 teaspoon black pepper
- 1/4 cup (25 g) shredded cheddar or parmesan (optional, for extra flavor)
- 1 tablespoon olive oil (for brushing the molds)
Step-by-Step Instructions
1. Boil the potatoes
Bring a large pot of salted water to a boil. Add the peeled and cubed potatoes, and cook until they’re fork-tender—about 15 minutes. Don’t overcook them or they’ll turn gummy later.
2. Mash them smooth
Drain the potatoes well and return them to the warm pot to let excess moisture evaporate. Then mash them using a potato masher or ricer until completely smooth. No lumps!
3. Add the good stuff
Mix in the butter, milk, garlic (if using), salt, and pepper. Stir until everything is creamy and well combined. The texture should be thick but spreadable. If it feels too stiff, add a splash more milk.
4. Add cheese (optional but amazing)
Fold in the shredded cheddar or parmesan if you want a more savory, melty flavor.
5. Prepare your mold
Lightly brush each skull cavity with olive oil. This prevents sticking and helps create that golden crust. Place the mold on a baking sheet for stability.
6. Fill and shape
Spoon the mashed potatoes into each mold cavity. Use a spatula or the back of a spoon to press it down firmly and smooth the surface. You want them packed well so they hold their shape.
7. Bake to perfection
Preheat your oven to 400°F (200°C). Bake the skulls for 25–30 minutes, or until the tops are golden and slightly crispy.
8. Cool and unmold
Let them cool for about 5 minutes before gently popping them out of the molds. If they’re a little too soft, don’t worry—they firm up as they cool.
Serving Ideas
- Serve on a dark platter with a drizzle of ketchup “blood.”
- Pair with a bowl of ranch or spicy aioli for dipping.
- Arrange them alongside grilled chicken, steak, or veggies for a Halloween dinner.
- Garnish with fresh herbs or grated cheese for extra flair.
Variations & Customization
- Cheesy Skull Potatoes: Add mozzarella or pepper jack for a gooey center.
- Loaded Style: Mix in cooked bacon bits, chives, and sour cream.
- Spicy Version: Add a pinch of cayenne or a dash of hot sauce.
- Vegan-Friendly: Use plant-based butter and milk substitutes.
Make-Ahead & Storage
- Make-ahead: Prepare the mashed mixture up to 1 day in advance. Keep it covered in the fridge, then fill the molds and bake when ready.
- Refrigerate: Store leftover skulls in an airtight container for up to 3 days.
- Reheat: Warm them in the oven at 350°F (175°C) for 10 minutes to bring back their crispness.
- Freeze: Freeze baked skulls on a tray first, then transfer to a bag. Reheat directly from frozen for 15–20 minutes at 375°F (190°C).
Pro Tips & Mistakes to Avoid
- Dry your potatoes: Excess water makes them mushy and hard to shape.
- Don’t skip the oiling step: It helps them release easily and brown beautifully.
- Pack the molds tightly: Loose filling can cause them to crumble.
- Let them rest: Unmolding too soon can break the shape—give them 5 minutes.
- Use russet or Yukon Gold potatoes: They mash the best and hold structure well.
Recipe Details
- Yield: 12 skull potatoes
- Prep Time: 20 minutes
- Cook Time: 30 minutes
- Total Time: 50 minutes
- Calories per serving: ~120 kcal
Halloween recipes don’t always have to be sugary or over-the-top—sometimes, something simple like these Skull Potatoes can steal the show. They’re spooky, satisfying, and surprisingly easy to make. I promise once you try them, they’ll become a yearly tradition.

Halloween Skull Potatoes
4
servings20
minutes30
minutes120
kcalThese are basically mashed potatoes in disguise—fluffy inside, crispy outside, and just creepy enough to fit the theme. You mold them in a skull-shaped silicone tray (the kind made for baking or candy), bake them until they’re golden, and boom—you’ve got edible skulls that are equal parts eerie and irresistible.
Ingredients
I’ve made a lot of spooky snacks over the years, but these Halloween Skull Potatoes might just be my favorite. There’s something about a tray of crispy, golden potatoes shaped like little skulls that instantly turns a simple side dish into the star of the Halloween table. Every time I make them, people can’t help but smile—and then grab another one.
These are basically mashed potatoes in disguise—fluffy inside, crispy outside, and just creepy enough to fit the theme. You mold them in a skull-shaped silicone tray (the kind made for baking or candy), bake them until they’re golden, and boom—you’ve got edible skulls that are equal parts eerie and irresistible.
What makes this recipe so special is how unexpectedly good they taste. You’d think they’re just for fun, but they’re seriously delicious—rich, buttery, garlicky, and customizable in so many ways. They also make a perfect party dish because you can prep them ahead of time, pop them in the oven before guests arrive, and watch everyone’s faces light up when they see them.
Why You’ll Love This Recipe
Spooky and fun: Perfect for Halloween parties or movie nights.
Simple ingredients: Just potatoes, butter, milk, and a few spices.
Make-ahead friendly: You can prep the mashed mixture the day before.
Crispy outside, creamy inside: The best texture combo ever.
Kid and adult approved: Fun for kids, tasty enough for grown-ups.
Tools You’ll Need
Skull-shaped silicone mold: This is the key! It gives the potatoes their shape and makes removal easy. (You can find these online or in Halloween baking aisles.)
Potato masher or ricer: For smooth, lump-free potatoes.
Mixing bowl: To combine all the ingredients.
Baking sheet: To support the silicone mold in the oven.
Small spatula or spoon: For pressing the mixture into the molds evenly.
Ingredients
(Makes about 12 skulls)
2 pounds (900 g) russet potatoes, peeled and cubed
4 tablespoons (60 g) unsalted butter
1/2 cup (120 ml) milk (whole milk gives the best texture)
2 cloves garlic, minced (optional but so worth it)
1/2 teaspoon salt, or to taste
1/4 teaspoon black pepper
1/4 cup (25 g) shredded cheddar or parmesan (optional, for extra flavor)
1 tablespoon olive oil (for brushing the molds)
Directions
- Step-by-Step Instructions
- Boil the potatoes
- Bring a large pot of salted water to a boil. Add the peeled and cubed potatoes, and cook until they’re fork-tender—about 15 minutes. Don’t overcook them or they’ll turn gummy later.
- Mash them smooth
- Drain the potatoes well and return them to the warm pot to let excess moisture evaporate. Then mash them using a potato masher or ricer until completely smooth. No lumps!
- Add the good stuff
- Mix in the butter, milk, garlic (if using), salt, and pepper. Stir until everything is creamy and well combined. The texture should be thick but spreadable. If it feels too stiff, add a splash more milk.
- Add cheese (optional but amazing)
- Fold in the shredded cheddar or parmesan if you want a more savory, melty flavor.
- Prepare your mold
- Lightly brush each skull cavity with olive oil. This prevents sticking and helps create that golden crust. Place the mold on a baking sheet for stability.
- Fill and shape
- Spoon the mashed potatoes into each mold cavity. Use a spatula or the back of a spoon to press it down firmly and smooth the surface. You want them packed well so they hold their shape.
- Bake to perfection
- Preheat your oven to 400°F (200°C). Bake the skulls for 25–30 minutes, or until the tops are golden and slightly crispy.
- Cool and unmold
- Let them cool for about 5 minutes before gently popping them out of the molds. If they’re a little too soft, don’t worry—they firm up as they cool.
Notes
- Dry your potatoes: Excess water makes them mushy and hard to shape.
Don’t skip the oiling step: It helps them release easily and brown beautifully.
Pack the molds tightly: Loose filling can cause them to crumble.
Let them rest: Unmolding too soon can break the shape—give them 5 minutes.
Use russet or Yukon Gold potatoes: They mash the best and hold structure well.