I’ve always loved Halloween for its playful creativity, and this Halloween Pumpkin Veggie Tray is one of my favorite ways to bring that spirit to the table—literally. It’s festive, fun, and surprisingly easy to make. I like how it gives me that “wow” moment without the sugar overload of candy or cupcakes. Every time I bring this to a party, people gather around it, half impressed and half reaching for the ranch dip before I even finish setting it down.
What Is a Halloween Pumpkin Veggie Tray?
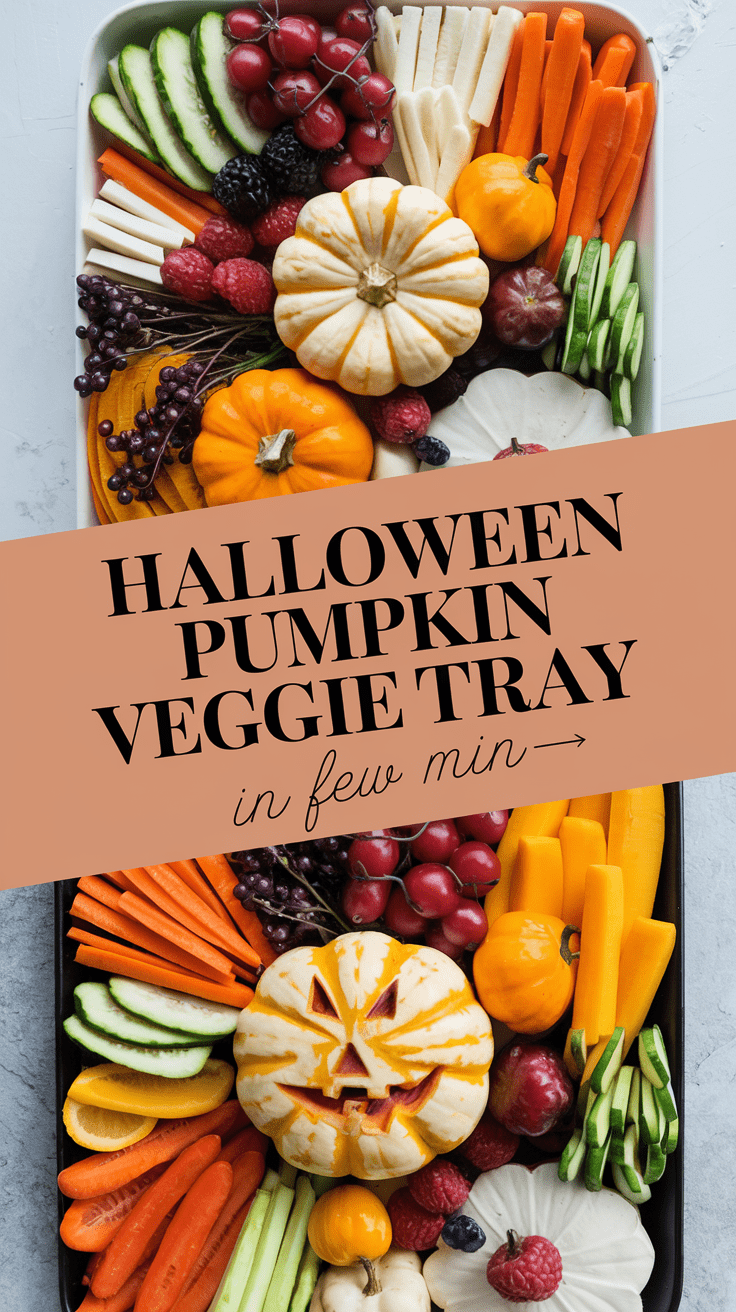
It’s a colorful platter of fresh vegetables arranged to look like a smiling jack-o’-lantern. Think of bright orange carrots forming the pumpkin face, shiny black olives for eyes, and crisp green celery or broccoli as the stem. The design is simple, but the result is striking—a healthy centerpiece that feels festive without trying too hard.
Why This Recipe Is Special
What makes this veggie tray stand out is that it turns something so ordinary—raw vegetables—into a showstopper. It’s all about presentation, color balance, and that satisfying feeling of eating something fresh amid all the Halloween treats. It’s kid-friendly, adult-approved, and can be customized for anyone’s taste or dietary needs. Plus, there’s zero cooking involved—just creativity and a few minutes of mindful arranging.
Why You’ll Love This Recipe
- It’s quick and easy. You’ll have it ready in under 20 minutes.
- It’s healthy. A fresh, crisp break from Halloween sugar overload.
- It’s crowd-pleasing. Even kids who “don’t like veggies” get curious enough to try it.
- It’s customizable. Swap veggies for what’s in season or what your family likes.
- It’s fun. You’ll actually enjoy arranging it—like edible art.
Tools You’ll Need
You don’t need anything fancy here—just a few kitchen basics:
- Large round serving tray or platter (12–14 in / 30–35 cm): The pumpkin canvas for your creation.
- Small bowls or ramekins: Perfect for holding dips or outlining facial features.
- Paring knife: Helps shape certain veggies for the jack-o’-lantern’s smile or eyes.
- Cutting board: Keeps your workspace clean and organized.
- Paper towels: For patting veggies dry so they don’t slide around.
Ingredients (US + Metric)
Here’s what you’ll need for the pumpkin face—feel free to tweak based on what you have:
- 4 cups (480 g) baby carrots – for the pumpkin “skin.”
- 1½ cups (150 g) broccoli florets – for the “stem” at the top.
- 1 cup (150 g) black olives – for the eyes and mouth details.
- 1 large yellow bell pepper, sliced – to brighten up the smile.
- 1 cup (150 g) cherry tomatoes – for added color and sweetness.
- 2 cups (200 g) celery sticks – to frame the edges or use as the “stem.”
- 1 cup (240 g) ranch dip or hummus – to serve in the center or alongside.
Optional additions:
- Cauliflower florets for a white contrast.
- Sliced cucumbers for layering.
- Mini bell peppers for pops of color.
Step-by-Step Instructions
1. Prep the veggies
Wash and dry everything thoroughly. Pat them dry with paper towels—this keeps your pumpkin face crisp, not soggy.
2. Choose your base
Lay out your large round platter. Visualize where your pumpkin “face” will go before you start placing veggies. I like to mentally divide the tray into sections: eyes, nose, mouth, and stem.
3. Build the pumpkin’s “skin”
Start with the baby carrots. Arrange them in a big circle around the platter, filling the inside gradually so it looks like a solid orange pumpkin. Overlap slightly for a fuller look.
4. Add the stem
Use the broccoli florets or celery at the top center to create the pumpkin’s stem. A few uneven edges make it look more natural.
5. Create the eyes and mouth
Use black olives or bell pepper slices to form triangle-shaped eyes. For the mouth, you can go playful—a curved grin made of olives or bell peppers works perfectly. Don’t stress about perfection. The charm is in the character!
6. Add details and accents
Fill in any gaps with cherry tomatoes or cucumber slices for contrast. If you’re using dip, place a small bowl in the middle or beside the tray.
7. Step back and adjust
Take a quick look from above. If the pumpkin doesn’t look balanced, move a few pieces until it feels right. I always find myself sneaking in one more carrot or adjusting the smile just a bit—it’s part of the fun.
Serving Ideas
- Serve with ranch, hummus, or yogurt dip for variety.
- Add crackers or pita chips on the side for those who like crunch.
- Pair it with a spooky drink, like green punch or sparkling apple cider.
Variations and Customization
- Spooky twist: Make a “ghost” version using cauliflower instead of carrots.
- Sweet version: Swap veggies for fruit like orange slices, berries, and apple chunks.
- Keto-friendly: Use low-carb veggies like cucumber, celery, and broccoli.
- Kids’ version: Add cheese cubes or pretzel sticks around the edges.
Storage and Make-Ahead Tips
- Make ahead: You can prep all veggies up to 24 hours in advance. Keep them in airtight containers lined with paper towels to absorb moisture.
- Store leftovers: Refrigerate covered for up to 2 days. If the carrots or broccoli start to dry out, sprinkle a few drops of cold water before serving again.
- Avoid sogginess: Keep dips separate until serving time.
Pro Tips and Mistakes to Avoid
Here’s the part I wish someone told me the first time I made this tray:
- Dry veggies thoroughly. Wet veggies will slide around and mess up your design.
- Use color contrast. Bright orange carrots pop more next to green and black.
- Don’t overpack the tray. Leave small gaps for breathing room—it looks cleaner.
- Have fun with it. The best ones are slightly imperfect and full of personality.
- Skip limp veggies. Fresh, firm produce makes the design look sharp and appetizing.
Recipe Details
- Yield: Serves 8–10
- Prep Time: 20 minutes
- Cook Time: 0 minutes
- Total Time: 20 minutes
Nutrition (per serving):
Calories: 80 | Fat: 3g | Carbs: 10g | Fiber: 3g | Protein: 2g | Sugar: 4g
Final Thoughts
There’s something so satisfying about turning a pile of vegetables into a cheerful Halloween pumpkin. I love how this recipe makes eating healthy feel festive and effortless—and it never fails to make guests smile. You don’t need to be an artist; you just need to play around with color and shape.
Halloween Pumpkin Veggie Tray
4
servings20
minutes00
minutes80
kcalIt’s a colorful platter of fresh vegetables arranged to look like a smiling jack-o’-lantern. Think of bright orange carrots forming the pumpkin face, shiny black olives for eyes, and crisp green celery or broccoli as the stem. The design is simple, but the result is striking—a healthy centerpiece that feels festive without trying too hard.
Ingredients
4 cups (480 g) baby carrots – for the pumpkin “skin.”
1½ cups (150 g) broccoli florets – for the “stem” at the top.
1 cup (150 g) black olives – for the eyes and mouth details.
1 large yellow bell pepper, sliced – to brighten up the smile.
1 cup (150 g) cherry tomatoes – for added color and sweetness.
2 cups (200 g) celery sticks – to frame the edges or use as the “stem.”
1 cup (240 g) ranch dip or hummus – to serve in the center or alongside.
Optional additions:
Cauliflower florets for a white contrast.
Sliced cucumbers for layering.
Mini bell peppers for pops of color.
Directions
- Prep the veggies
- Wash and dry everything thoroughly. Pat them dry with paper towels—this keeps your pumpkin face crisp, not soggy.
- Choose your base
- Lay out your large round platter. Visualize where your pumpkin “face” will go before you start placing veggies. I like to mentally divide the tray into sections: eyes, nose, mouth, and stem.
- Build the pumpkin’s “skin”
- Start with the baby carrots. Arrange them in a big circle around the platter, filling the inside gradually so it looks like a solid orange pumpkin. Overlap slightly for a fuller look.
- Add the stem
- Use the broccoli florets or celery at the top center to create the pumpkin’s stem. A few uneven edges make it look more natural.
- Create the eyes and mouth
- Use black olives or bell pepper slices to form triangle-shaped eyes. For the mouth, you can go playful—a curved grin made of olives or bell peppers works perfectly. Don’t stress about perfection. The charm is in the character!
- Add details and accents
- Fill in any gaps with cherry tomatoes or cucumber slices for contrast. If you’re using dip, place a small bowl in the middle or beside the tray.
- Step back and adjust
- Take a quick look from above. If the pumpkin doesn’t look balanced, move a few pieces until it feels right. I always find myself sneaking in one more carrot or adjusting the smile just a bit—it’s part of the fun.
Notes
- Here’s the part I wish someone told me the first time I made this tray:
Dry veggies thoroughly. Wet veggies will slide around and mess up your design.
Use color contrast. Bright orange carrots pop more next to green and black.
Don’t overpack the tray. Leave small gaps for breathing room—it looks cleaner.
Have fun with it. The best ones are slightly imperfect and full of personality.
Skip limp veggies. Fresh, firm produce makes the design look sharp and appetizing.