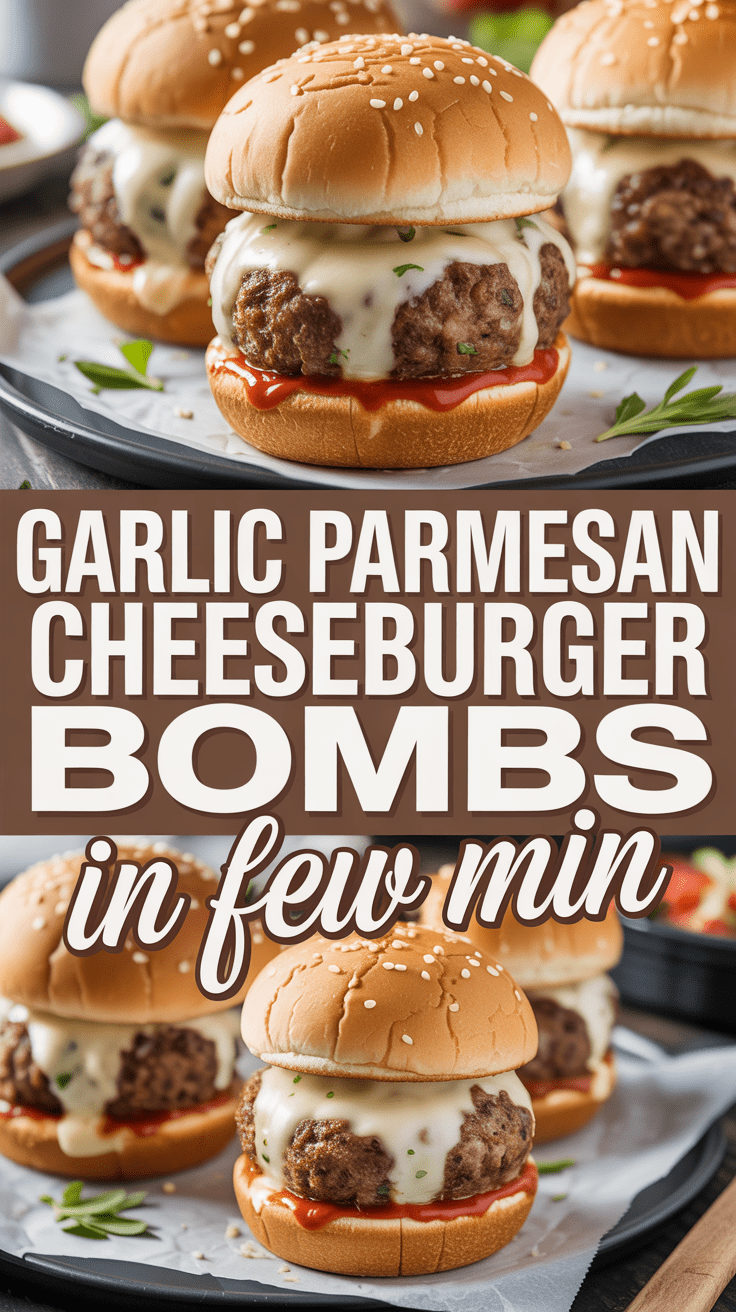
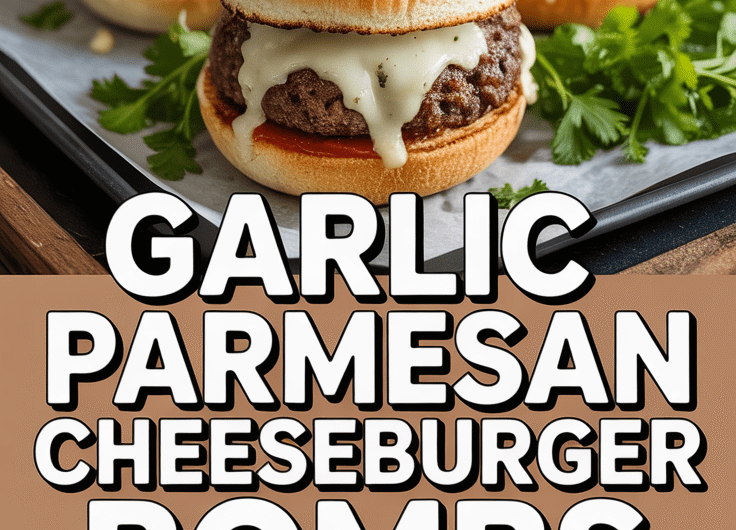
You know those recipes that make you stop mid-bite and think, “Wow, this is ridiculously good”? Yeah—these Garlic Parmesan Cheeseburger Bombs are one of those. The first time I made them, I honestly didn’t expect them to taste like a mini explosion of cheesy, garlicky heaven. But one bite in, and I knew I was in trouble (the good kind). These little flavor-packed bombs are everything you love about a juicy cheeseburger—wrapped up in soft, golden dough brushed with buttery garlic and parmesan.
A Little About the Recipe
Garlic Parmesan Cheeseburger Bombs are savory treats that pack the flavors of cheeseburgers in one bite. Each bomb is a mix of ground beef, cheese, and onion baked inside the biscuit dough which is then brushed with a heavenly garlic-parmesan sauce. They are perfect for game day, family dinners, or just a lazy day when you want to indulge without going out to grill.
Why This Recipe Is Special
This recipe is very special because it takes all the cheeseburger fun and gives you a portable, poppable, and dangerously addictive version. It is a fun and gourmet-like twist at the same time which requires almost no effort. Every bite is a perfect mix—crunchy golden outer covering, gooey cheesy inner part, and sticky garlicky butter.
Why You’ll Love This Recipe
- Bursts of flavor: Juicy beef, creamy cheese, and buttery garlic combine for an unforgettable mouthful.
- Kids love them: These are easily liked by the little ones just like adults—no mess, no fuss.
- Fast and Simple: You can serve them in less than 30 minutes.
- Great for parties: They can be used as appetizers or snacks during game nights and family gatherings.
- Versatile: Change the cheese, add bacon or garnish with your favorite spices—it’s your burger, your way.
Tools You’ll Need
You don’t need fancy gadgets here—just your regular kitchen tools:
- Mixing bowl: For combining the beef, cheese, and seasoning.
- Skillet (medium): To cook the beef and onion mixture.
- Baking sheet: Lined with parchment paper to prevent sticking.
- Pastry brush: For brushing on that glorious garlic butter.
- Small bowl: To mix the melted butter, garlic, and parmesan.
- Measuring cups & spoons: To keep your ratios right (because too much garlic is never really too much, but let’s stay balanced).
Ingredients
For the Filling
- 1 lb (450 g) ground beef
- 1 small onion, finely diced
- 1 tsp salt (or to taste)
- ½ tsp black pepper
- 1 tbsp ketchup (optional, adds a hint of tang)
- 1 tbsp mustard (optional for that burger flavor punch)
- 6 oz (170 g) cheddar cheese, cut into 1-inch cubes
For the Dough
- 1 can (16 oz / 450 g) refrigerated biscuit dough (like Pillsbury Grands), or homemade dough if you prefer
For the Garlic Parmesan Butter
- 4 tbsp (55 g) unsalted butter, melted
- 3 cloves garlic, minced
- 2 tbsp grated parmesan cheese
- 1 tbsp chopped fresh parsley (optional for color)
Step-by-Step Instructions
1. Preheat and Prepare
Preheat your oven to 375°F (190°C) and set a baking sheet lined with parchment paper. Keeping the bottoms nicely colored is the reason for trying this little step.
2. Cook the Beef
Set a skillet on medium heat. Put the ground beef and chopped onion in, using a spatula to divide the meat. After 6–8 minutes of cooking, it should be brown and no longer pink. Remove the excess grease. Salt and pepper are to be added. If you’re living large, put in a little ketchup and mustard and mix for that classic cheeseburger flavor. Allow to cool for a bit—it will be more convenient to handle later.
3. Fill the Dough
Open your biscuit dough and gently flatten each piece into a 4-inch circle. Place a spoonful of the beef mixture in the center, then top with a cube of cheese.
Here’s the trick: pinch the edges tightly to seal everything in. You don’t want any cheese escaping during baking. Roll it gently between your hands to smooth it out into a little ball.
4. Bake Until Golden
Place the sealed side down on your baking sheet. Bake for 13–16 minutes, or until puffed up and beautifully golden. Your kitchen will smell incredible by this point—you’ll want to sneak one early, but wait just a minute more.
5. Make the Garlic Parmesan Butter
During the time they are baking, your butter should be melted and the minced garlic and parmesan should be stirred into it. As soon as the bombs are taken out of the oven, the garlic butter should be immediately brushed on them.
If you are in the mood for something fancy, sprinkle some parsley on top. The moment the aromatic buttery-garlic dough encounters the warm butter, it envelops the kitchen with an aroma that is simply impossible to resist.
Serving Ideas
You can serve these Garlic Parmesan Cheeseburger Bombs with:
- A kiss of ketchup or burger sauce for dipping.
- A green salad to neutralize the richness.
- Chips or onion rings for a vintage diner-style combination.
- Or pile a few on a plate and see how fast they get eaten on game night.
Variations & Customization
- Add bacon: Mix in some cooked bacon bits for a meaty flavor.
- Change the cheese: Go for mozzarella, pepper jack, or even Swiss for a different taste.
- Make it fiery: Add chopped jalapeños or a little hot sauce to the beef.
- Go small: Take biscuit bits and cheese pieces for appetizer-sized bombs.
Make-Ahead & Storage
To make ahead: Prepare the bombs, put them on a baking tray, and chill them for up to 24 hours before baking.
To store: Put leftovers in a fridge-safe container for up to 3 days.
To reheat: Heat them in the air fryer at 350°F (175°C) for 3–4 minutes or in the oven for about 8 minutes—they’ll become crispy again.
To freeze: Freeze unbaked bombs on a tray in the freezer until hard, then put them in a freezer bag. Bake straight from frozen, but add a few extra minutes to the cooking time.
Pro Tips (And a Few Mistakes to Avoid)
- Seal tightly: If there are any openings, the cheese that has melted will ooze out and get burnt onto the pan.
- Don’t overfill: One spoonful of meat and one small cheese cube is just right—less mess, better results.
- Allow the filling to cool for a short time: Hot filling has a slippery effect on the dough and makes it difficult to seal.
- Brush right after baking: The garlic butter soaks in beautifully while the bombs are hot.
- Don’t skip the parchment paper: It keeps the bottoms from sticking and helps with even browning.
Recipe Details
- Yield: 8 Cheeseburger Bombs
- Prep Time: 15 minutes
- Cook Time: 15 minutes
- Total Time: 30 minutes
- Calories: Approx. 320 per bomb (varies by cheese and dough brand)
Final Thoughts
There’s something magical about recipes that surprise you with every bite—and these Garlic Parmesan Cheeseburger Bombs do exactly that. They’re fun to make, wildly satisfying to eat, and guaranteed to impress anyone you share them with (if you even want to share).
Garlic Parmesan Cheeseburger Bombs
4
servings15
minutes15
minutes320
kcalGarlic Parmesan Cheeseburger Bombs are savory treats that pack the flavors of cheeseburgers in one bite. Each bomb is a mix of ground beef, cheese, and onion baked inside the biscuit dough which is then brushed with a heavenly garlic-parmesan sauce. They are perfect for game day, family dinners, or just a lazy day when you want to indulge without going out to grill.
Ingredients
For the Filling
1 lb (450 g) ground beef
1 small onion, finely diced
1 tsp salt (or to taste)
½ tsp black pepper
1 tbsp ketchup (optional, adds a hint of tang)
1 tbsp mustard (optional for that burger flavor punch)
6 oz (170 g) cheddar cheese, cut into 1-inch cubes
For the Dough
1 can (16 oz / 450 g) refrigerated biscuit dough (like Pillsbury Grands), or homemade dough if you prefer
For the Garlic Parmesan Butter
4 tbsp (55 g) unsalted butter, melted
3 cloves garlic, minced
2 tbsp grated parmesan cheese
1 tbsp chopped fresh parsley (optional for color)
Directions
- Preheat and Prepare
- Preheat your oven to 375°F (190°C) and set a baking sheet lined with parchment paper. Keeping the bottoms nicely colored is the reason for trying this little step.
- Cook the Beef
- Set a skillet on medium heat. Put the ground beef and chopped onion in, using a spatula to divide the meat. After 6–8 minutes of cooking, it should be brown and no longer pink. Remove the excess grease. Salt and pepper are to be added. If you're living large, put in a little ketchup and mustard and mix for that classic cheeseburger flavor. Allow to cool for a bit—it will be more convenient to handle later.
- Fill the Dough
- Open your biscuit dough and gently flatten each piece into a 4-inch circle. Place a spoonful of the beef mixture in the center, then top with a cube of cheese.
- Here’s the trick: pinch the edges tightly to seal everything in. You don’t want any cheese escaping during baking. Roll it gently between your hands to smooth it out into a little ball.
- Bake Until Golden
- Place the sealed side down on your baking sheet. Bake for 13–16 minutes, or until puffed up and beautifully golden. Your kitchen will smell incredible by this point—you’ll want to sneak one early, but wait just a minute more.
- Make the Garlic Parmesan Butter
- During the time they are baking, your butter should be melted and the minced garlic and parmesan should be stirred into it. As soon as the bombs are taken out of the oven, the garlic butter should be immediately brushed on them.
- If you are in the mood for something fancy, sprinkle some parsley on top. The moment the aromatic buttery-garlic dough encounters the warm butter, it envelops the kitchen with an aroma that is simply impossible to resist.
Notes
- Seal tightly: If there are any openings, the cheese that has melted will ooze out and get burnt onto the pan.
Don’t overfill: One spoonful of meat and one small cheese cube is just right—less mess, better results.
Allow the filling to cool for a short time: Hot filling has a slippery effect on the dough and makes it difficult to seal.
Brush right after baking: The garlic butter soaks in beautifully while the bombs are hot.
Don’t skip the parchment paper: It keeps the bottoms from sticking and helps with even browning.