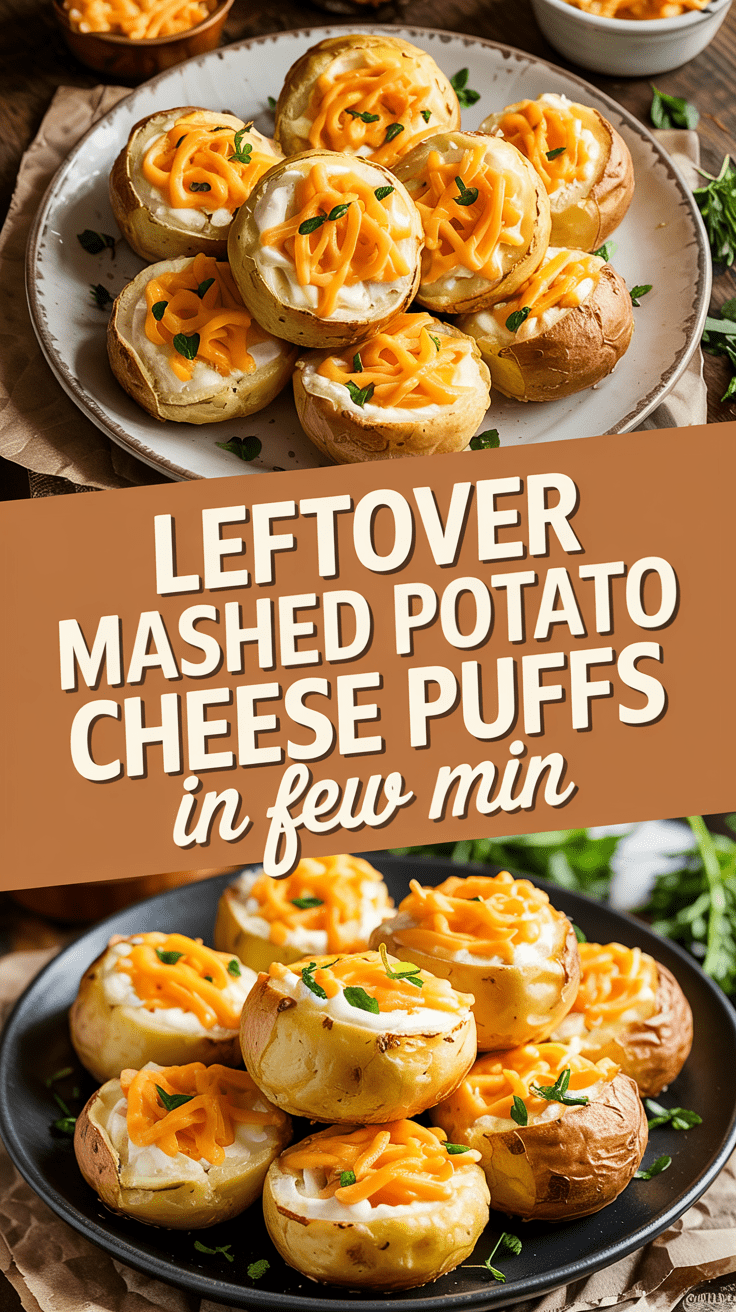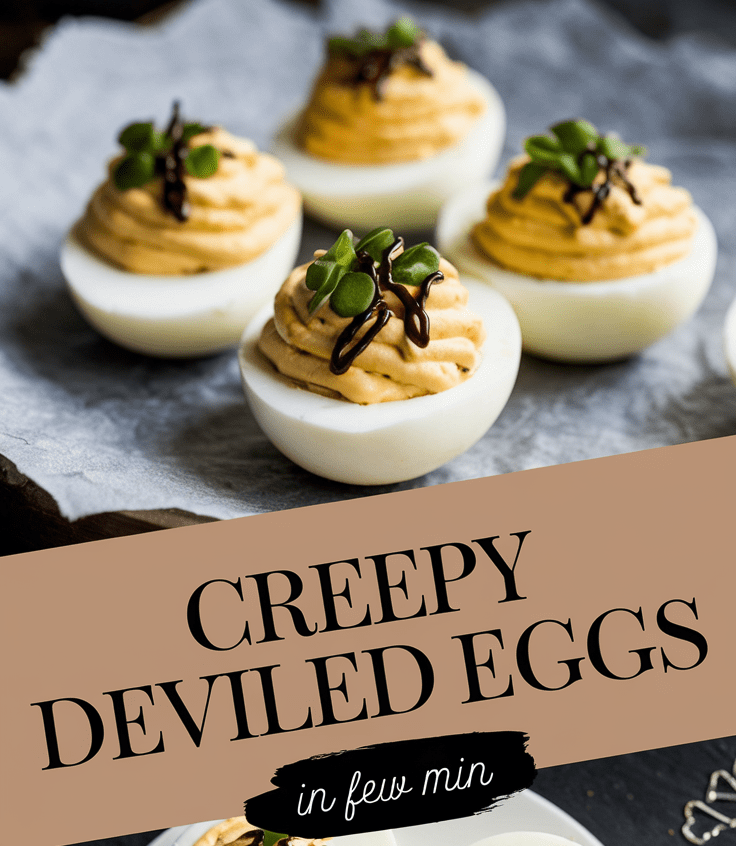
There’s something delightfully weird about Halloween food, isn’t there? I love how it gives us permission to play with our food—literally. These Creepy Deviled Eggs are my go-to every October because they’re equal parts spooky and delicious. They’re that perfect bite-sized treat that makes guests stop mid-conversation and go, “Wait… are those eyeballs?”—and then they eat three more.
A Quick Introduction
If you’ve ever made classic deviled eggs, this version takes the same creamy, tangy filling and gives it a sinister twist. We’re talking bloodshot “eyeballs” made with food coloring, olives, and a little creativity. They’re easy to make, taste incredible, and bring major Halloween vibes to your snack table.
Why This Recipe Is Special
What I love about this recipe is how it strikes the perfect balance between creepy and craveable. The eggs look like something straight out of a monster movie, but they taste just like the deviled eggs we all secretly hover over at parties. Plus, you can get the kids involved in decorating—they’ll love “painting” the eggs with food dye.
Why You’ll Love This Recipe
- Looks incredible – These deviled eggs double as edible decorations for your Halloween spread.
- Tastes amazing – Creamy, tangy, and rich with just the right amount of seasoning.
- Easy to customize – Adjust the filling flavor or design for different spooky themes.
- Make-ahead friendly – You can prep them a day early and assemble right before serving.
- Kid- and adult-approved – Everyone loves them, no matter their age.
Tools You’ll Need
- Medium saucepan – For boiling the eggs perfectly without cracking.
- Mixing bowl – To mash the yolks and mix in the filling ingredients.
- Fork or potato masher – Helps get a smooth yolk mixture without lumps.
- Piping bag or zip-top bag – For neatly filling the egg whites.
- Small brush or toothpick – To “draw” veins on the eggs using food coloring.
- Paper towels – For drying eggs and cleaning up any coloring messes.
Ingredients
Makes: 12 creepy deviled eggs (24 halves)
Prep Time: 15 minutes
Cook Time: 10 minutes
Chill Time: 20 minutes
Total Time: 45 minutes
For the Eggs
- 12 large eggs (or about 600 g)
- Water (enough to cover the eggs by 1 inch)
For the Filling
- 1/3 cup (80 g) mayonnaise
- 1 tablespoon (15 g) Dijon mustard
- 1 teaspoon (5 ml) white vinegar or lemon juice
- Salt and pepper, to taste
- Optional: a pinch of smoked paprika or cayenne for heat
For Decoration
- Red food coloring (liquid or gel)
- Green or black olives, sliced into thin rounds (for “pupils”)
- Optional: blue or green food coloring for “iris” effect
Step-by-Step Instructions
1. Boil the Eggs
Place the eggs in a saucepan and cover with cold water by about an inch. Bring to a boil over medium-high heat. Once boiling, turn off the heat and cover the pan. Let the eggs sit for 10–12 minutes.
Personal tip: I always set a timer—overcooked eggs get that green ring around the yolk, which isn’t cute even for Halloween.
2. Cool and Peel
Transfer the eggs immediately to a bowl of ice water and let them sit for 10 minutes. This stops the cooking and makes peeling so much easier. Gently crack and peel the eggs under cool running water.
3. Slice and Scoop
Slice each egg in half lengthwise. Pop the yolks into a mixing bowl and set the whites aside on a plate.
4. Make the Filling
Mash the yolks with a fork until smooth. Add mayonnaise, mustard, vinegar (or lemon juice), salt, and pepper. Mix until creamy and well blended. Adjust seasoning to taste—you want it slightly tangy and savory.
Pro tip: If your filling feels too thick, stir in a tiny splash of cream or more mayo to loosen it up.
5. Color the “Veins”
Using a small brush or toothpick dipped in red food coloring, draw thin squiggly lines on the outside of the egg whites. These create the “bloodshot” look. Don’t worry if they’re uneven—that makes them even creepier.
Tip: Let the colored eggs dry for 10 minutes before filling so the dye doesn’t smear.
6. Fill the Eggs
Spoon or pipe the yolk mixture into each egg white half. I like using a zip-top bag with a corner snipped off—it’s quick and neat.
7. Add the “Eyes”
Place one olive slice on top of each filled egg to make the “pupil.” If you want to go the extra mile, add a small dot of green or blue food coloring around the olive to create an “iris” effect.
Serving Ideas
Serve these on a dark platter or Halloween tray for maximum spook factor. You can even surround them with shredded lettuce (for a “nest of slime” look) or drizzle a little hot sauce for a fake “blood” touch.
Variations & Customizations
- Spicy twist: Add a dash of sriracha or hot sauce to the yolk mix.
- Guacamole deviled eggs: Swap half the mayo for mashed avocado.
- Beet-dyed eggs: Soak peeled eggs in beet juice for a bloody red shell.
- Monster eyes: Use different-colored olives, or even small pieces of pickles for variety.
Storage & Make-Ahead Tips
- Make ahead: Boil and peel the eggs up to 2 days in advance. Store in an airtight container in the fridge.
- Assemble later: Mix the yolk filling a day ahead and refrigerate it separately. Pipe and decorate right before serving.
- Leftovers: Keep filled eggs covered in the fridge and eat within 2 days.
Pro Tips & Mistakes to Avoid
- Don’t skip the ice bath: It’s the secret to easy peeling every time.
- Go light on food coloring: A little goes a long way—you don’t want pink eggs instead of veiny ones.
- Taste before filling: Adjust the salt and acidity while the filling’s still in the bowl.
- Dry before decorating: If your egg whites are wet, the dye won’t stick properly.
- Use fresh eggs for flavor—but not too fresh: Eggs that are 7–10 days old peel easier than very fresh ones.
Nutrition (Per Serving: 2 halves)
- Calories: 120
- Protein: 6 g
- Fat: 10 g
- Carbohydrates: 1 g
- Fiber: 0 g
- Sugar: 0 g
Final Thoughts
If you’re looking for a Halloween dish that gets people talking (and snacking), these Creepy Deviled Eggs are it. They’re festive, easy, and just the right amount of gross—in the best possible way. I love making them every year, and I promise once you see people’s faces light up—or squirm—you’ll want to make them, too.
Creepy Deviled Eggs
4
servings15
minutes10
minutes120
kcalIf you’ve ever made classic deviled eggs, this version takes the same creamy, tangy filling and gives it a sinister twist. We’re talking bloodshot “eyeballs” made with food coloring, olives, and a little creativity. They’re easy to make, taste incredible, and bring major Halloween vibes to your snack table.
Ingredients
For the Eggs
12 large eggs (or about 600 g)
Water (enough to cover the eggs by 1 inch)
For the Filling
1/3 cup (80 g) mayonnaise
1 tablespoon (15 g) Dijon mustard
1 teaspoon (5 ml) white vinegar or lemon juice
Salt and pepper, to taste
Optional: a pinch of smoked paprika or cayenne for heat
For Decoration
Red food coloring (liquid or gel)
Green or black olives, sliced into thin rounds (for “pupils”)
Optional: blue or green food coloring for “iris” effect
Directions
- Boil the Eggs
- Place the eggs in a saucepan and cover with cold water by about an inch. Bring to a boil over medium-high heat. Once boiling, turn off the heat and cover the pan. Let the eggs sit for 10–12 minutes.
- Personal tip: I always set a timer—overcooked eggs get that green ring around the yolk, which isn’t cute even for Halloween.
- Cool and Peel
- Transfer the eggs immediately to a bowl of ice water and let them sit for 10 minutes. This stops the cooking and makes peeling so much easier. Gently crack and peel the eggs under cool running water.
- Slice and Scoop
- Slice each egg in half lengthwise. Pop the yolks into a mixing bowl and set the whites aside on a plate.
- Make the Filling
- Mash the yolks with a fork until smooth. Add mayonnaise, mustard, vinegar (or lemon juice), salt, and pepper. Mix until creamy and well blended. Adjust seasoning to taste—you want it slightly tangy and savory.
- Pro tip: If your filling feels too thick, stir in a tiny splash of cream or more mayo to loosen it up.
- Color the “Veins”
- Using a small brush or toothpick dipped in red food coloring, draw thin squiggly lines on the outside of the egg whites. These create the “bloodshot” look. Don’t worry if they’re uneven—that makes them even creepier.
- Tip: Let the colored eggs dry for 10 minutes before filling so the dye doesn’t smear.
- Fill the Eggs
- Spoon or pipe the yolk mixture into each egg white half. I like using a zip-top bag with a corner snipped off—it’s quick and neat.
- Add the “Eyes”
- Place one olive slice on top of each filled egg to make the “pupil.” If you want to go the extra mile, add a small dot of green or blue food coloring around the olive to create an “iris” effect.
Notes
- Don’t skip the ice bath: It’s the secret to easy peeling every time.
Go light on food coloring: A little goes a long way—you don’t want pink eggs instead of veiny ones.
Taste before filling: Adjust the salt and acidity while the filling’s still in the bowl.
Dry before decorating: If your egg whites are wet, the dye won’t stick properly.
Use fresh eggs for flavor—but not too fresh: Eggs that are 7–10 days old peel easier than very fresh ones.