I’ll be honest with you right from the jump—I have a soft spot for any cookie that looks harder than it actually is. These Christmas Pinwheel Cookies are one of those recipes that make people think you spent hours crafting something fancy, when really… you and I both know it’s just a simple dough, a little color, and a fun swirl that does all the showing off. Every time I make them, I feel like I’m slipping a little holiday magic onto the cookie tray.
A quick peek at what these cookies are
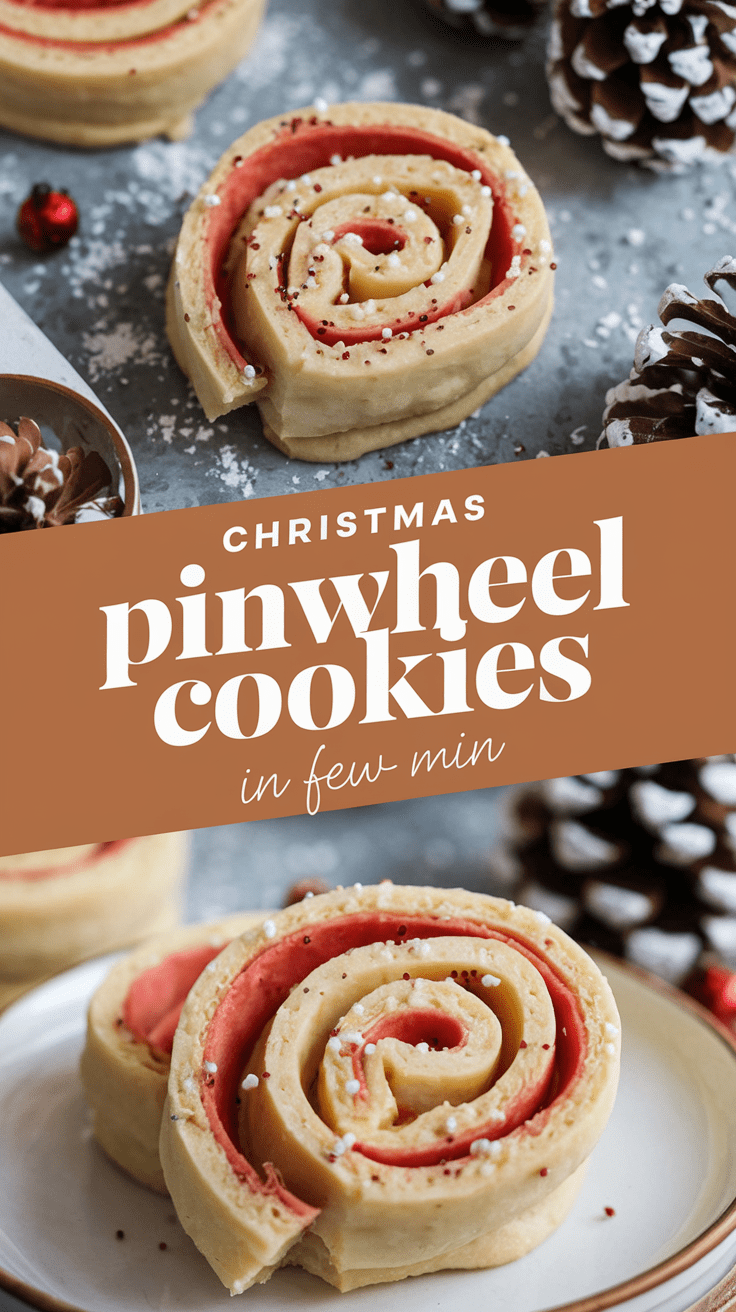
Christmas Pinwheel Cookies are soft, buttery sugar cookies that get rolled into layers of red-and-green dough. When you slice them, you get that signature spiral-stripe pattern that practically screams “holiday cheer.” They’re festive without being fussy, and they bake up with crisp edges and a tender center that feels like the season in every bite.
Why these cookies feel special
There’s something nostalgic about rolling dough, stacking colors, and slicing into perfect swirls. It brings out the kid energy in me every single time. Plus, these cookies are the kind you can make with family or friends, because the steps are simple enough for anyone to jump in, and the payoff looks way more impressive than the effort it requires. They’re also perfect for gifting, cookie swaps, or just filling a jar on your counter and pretending you’re running the coziest little bakery in town.
Why You’ll Love This Recipe
You’ll appreciate this recipe if you’re into treats that are fun to make, beautiful to look at, and even better to eat.
- Soft, buttery flavor that feels comforting and nostalgic
- Colorful, eye-catching swirls that look great on any holiday table
- Make-ahead friendly—dough freezes beautifully
- Kid-friendly activity and perfect for holiday baking traditions
- Customizable colors, flavors, and sprinkles
- Foolproof steps with lots of reassurance (I’ve got your back)
Tools You’ll Need
I’ll quickly walk you through what each tool does, so nothing feels unfamiliar.
- Baking sheets: You’ll need two, so you can rotate batches easily.
- Silicone baking mats or parchment paper: Helps cookies bake evenly and prevents sticking.
- Mixing bowls (2–3 sizes): One for butter and sugar, one for dry ingredients, and maybe one spare just in case you feel fancy.
- Electric hand mixer or stand mixer: Makes creaming the butter and sugar quick and fluffy.
- Rubber spatula: My favorite tool for scraping every last bit of good dough from the bowl.
- Food coloring gel: Gives vibrant color without adding too much moisture.
- Plastic wrap: Helps you chill and shape the dough without mess.
- Rolling pin: Keeps the dough layers even and helps achieve those clean swirls.
- Sharp knife: For neat slicing (a serrated knife or chef’s knife works).
- Ruler (optional, but helpful): If you like precision for perfectly sized cookies.
Ingredients (US + Metric)
These are simple pantry staples, but together they create holiday gold.
- 1 cup (226 g) unsalted butter, softened
- 1 cup (200 g) granulated sugar
- 1 large egg (50 g)
- 1 teaspoon vanilla extract (5 ml)
- 2½ cups (300 g) all-purpose flour
- ½ teaspoon baking powder (2 g)
- ½ teaspoon salt (2 g)
- Red gel food coloring
- Green gel food coloring
- Optional: holiday sprinkles for the outside
Yield, Time & Nutrition
- Yield: About 30–36 cookies
- Prep time: 25 minutes
- Chill time: 2 hours
- Bake time: 10–11 minutes per batch
- Total time: About 3 hours
- Nutrition (per cookie): Approx. 105 calories, 5g fat, 13g carbs, 1g protein
How to Make Christmas Pinwheel Cookies
I’ll walk you through everything step-by-step, and I’ll tell you where people usually get nervous—so you don’t have to be.
1. Cream the butter and sugar
Beat the softened butter and sugar together until it’s light, fluffy, and creamy. You’ll know it’s right when the mixture looks pale and smells sweet. Don’t rush this part—it sets the texture of the whole cookie.
2. Add egg and vanilla
Beat in the egg and vanilla. The mixture might look slightly looser now, and that’s perfect.
3. Mix the dry ingredients
In another bowl, whisk the flour, baking powder, and salt. Keep it simple—no overthinking.
4. Combine wet and dry
Add the dry mixture into the butter mixture in two or three parts. The dough will be soft but not sticky.
5. Divide and color
Split the dough into two equal balls. Add red gel coloring to one and green to the other. Start small and add more until the colors look bold and festive.
Tip: Gel coloring is strong—so a little goes a long way.
6. Roll the dough
Roll each colored dough out into a rectangle of roughly the same size. I usually aim for 9×12 inches, but no ruler police will stop you if you’re a little off.
7. Layer the dough
Place one rectangle on top of the other. Use your rolling pin to gently press them together so they stick.
8. Roll into a log
Starting from the long edge, roll the dough into a tight log. Go slowly, using your fingers to tuck the dough in as you roll. If it cracks, just pinch it back together—no drama.
9. Chill the log
Wrap the log tightly in plastic wrap and refrigerate at least 2 hours. This step keeps the swirls neat when slicing.
10. Slice the cookies
Once the dough is firm, cut the log into ¼-inch slices. A sharp knife helps keep the edges clean.
11. Bake
Bake at 350°F (177°C) for 10–11 minutes. You’re looking for set edges but no browning. Let them cool a few minutes on the sheet before transferring to a rack.
Serving Ideas
- Pair with hot cocoa, spiced tea, or coffee
- Add them to a holiday dessert board
- Wrap stacks of cookies with ribbon for DIY edible gifts
- Use as décor on gingerbread houses or holiday charcuterie boards
Variations & Customizations
- Add peppermint extract for a candy-cane style flavor
- Swap red/green for blue/white for a winter theme
- Roll the outside in sprinkles before chilling
- Add cocoa to one layer for a chocolate swirl
- Make mini pinwheels by rolling smaller rectangles
Storage & Make-Ahead
- Room temperature: 5–6 days in an airtight container
- Freeze baked cookies: Up to 2 months
- Freeze dough logs: Up to 3 months—just thaw slightly before slicing
- Refrigerate dough: Up to 48 hours before baking
Pro Tips (aka things I’d tell a friend)
- Chill longer if your dough feels soft. Cold dough = clean spirals.
- If the dough cracks while rolling, warm it between your hands for ten seconds—works every time.
- Slice straight down instead of sawing to avoid distorted spirals.
- Use parchment between the dough layers to avoid sticking.
- Don’t overload the dough with food coloring—too much changes texture.
Mistakes to Avoid
- Skipping chilling time—it’s the only way to get sharp designs
- Overbaking—they should not brown
- Using watery food coloring—makes dough mushy
- Rolling the dough unevenly—leads to wobbly or uneven cookies
A Warm Wrap-Up
I really hope you give these Christmas Pinwheel Cookies a try. They’re fun, festive, and honestly a little addictive once you get into the dough-rolling groove. If you make them, I’d love to hear how they turned out, what colors you used, or if you added your own twist. Share a photo, leave a comment, or tell a friend—holiday baking is always better when it’s shared.

Christmas Pinwheel Cookies
4
servings25
minutes10
minutes105
kcalChristmas Pinwheel Cookies are soft, buttery sugar cookies that get rolled into layers of red-and-green dough. When you slice them, you get that signature spiral-stripe pattern that practically screams “holiday cheer.” They’re festive without being fussy, and they bake up with crisp edges and a tender center that feels like the season in every bite.
Ingredients
1 cup (226 g) unsalted butter, softened
1 cup (200 g) granulated sugar
1 large egg (50 g)
1 teaspoon vanilla extract (5 ml)
2½ cups (300 g) all-purpose flour
½ teaspoon baking powder (2 g)
½ teaspoon salt (2 g)
Red gel food coloring
Green gel food coloring
Optional: holiday sprinkles for the outside
Directions
- Cream the butter and sugar
- Beat the softened butter and sugar together until it’s light, fluffy, and creamy. You’ll know it’s right when the mixture looks pale and smells sweet. Don’t rush this part—it sets the texture of the whole cookie.
- Add egg and vanilla
- Beat in the egg and vanilla. The mixture might look slightly looser now, and that’s perfect.
- Mix the dry ingredients
- In another bowl, whisk the flour, baking powder, and salt. Keep it simple—no overthinking.
- Combine wet and dry
- Add the dry mixture into the butter mixture in two or three parts. The dough will be soft but not sticky.
- Divide and color
- Split the dough into two equal balls. Add red gel coloring to one and green to the other. Start small and add more until the colors look bold and festive.
- Tip: Gel coloring is strong—so a little goes a long way.
- Roll the dough
- Roll each colored dough out into a rectangle of roughly the same size. I usually aim for 9×12 inches, but no ruler police will stop you if you’re a little off.
- Layer the dough
- Place one rectangle on top of the other. Use your rolling pin to gently press them together so they stick.
- Roll into a log
- Starting from the long edge, roll the dough into a tight log. Go slowly, using your fingers to tuck the dough in as you roll. If it cracks, just pinch it back together—no drama.
- Chill the log
- Wrap the log tightly in plastic wrap and refrigerate at least 2 hours. This step keeps the swirls neat when slicing.
- 10. Slice the cookies
- Once the dough is firm, cut the log into ¼-inch slices. A sharp knife helps keep the edges clean.
- 11. Bake
- Bake at 350°F (177°C) for 10–11 minutes. You’re looking for set edges but no browning. Let them cool a few minutes on the sheet before transferring to a rack.
Notes
- Chill longer if your dough feels soft. Cold dough = clean spirals.
If the dough cracks while rolling, warm it between your hands for ten seconds—works every time.
Slice straight down instead of sawing to avoid distorted spirals.
Use parchment between the dough layers to avoid sticking.
Don’t overload the dough with food coloring—too much changes texture.