Honestly, I was taken aback by the taste of the Cheesy Thumbprint Savory Cookies, my first time making them. I had envisioned them to be something that could be eaten as a snack and would be crispy in texture, yet the softness and flavor of the jam with the buttery, crumbly, and cheesy bites all at the same time in the center of the cookies was pure magic coming from the oven. They are nothing but the savory version of winter cookies with jam filling—playful, elegant, and irresistibly addictive.
What Are Cheesy Thumbprint Savory Cookies?
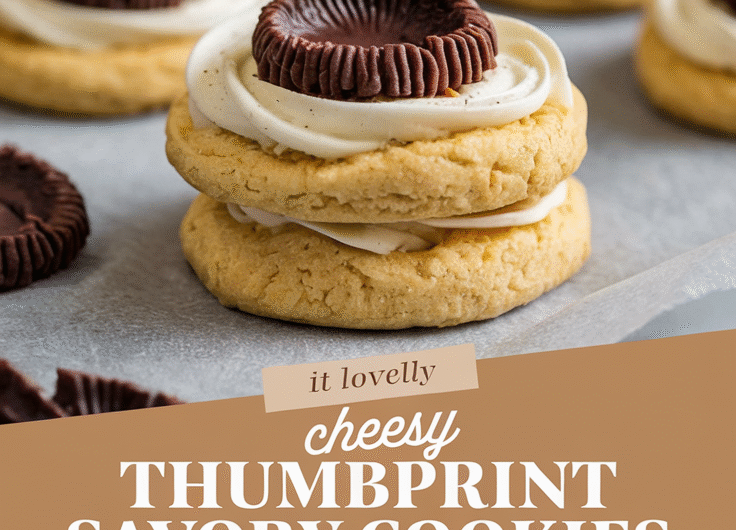
To be honest, these are not just cookies. A shortbread-style dough treated with sharp cheese, butter, and a little bit of herbs, lighted up in the middle with a thumbprint (just as sweet cookies) and filled with something savory—imagine red pepper jelly, caramelized onion jam, or just a little of tomato chutney. They are just the right size for a snack, appetizer, or a party nibble that always makes people ask, “What is this delicious thing?”
Why This Recipe Is Special
There is a certain charm in the way the cookies balance between comfort and sophistication. The base, which is rich in butter, dissolves in the mouth, whereas the cheese makes the taste salty and adds a nutty flavor. The filling is reached next—the sweet heat or tangy zest—when suddenly you find yourself eating the fourth one without being aware of it. Making them is straightforward enough for an afternoon bake, yet classy enough for your festive table or a night of wine and cheese.
Why You’ll Love This Recipe
- Crispy edges, soft center: The texture is perfectly balanced so that it melts and crunches at once.
- Make-ahead friendly: The dough can be chilled in the fridge or frozen, and baking can be done later.
- Endlessly customizable: Different cheeses, herbs, or savory fillings can be tried.
- Crowd-pleaser: Ideal for parties, snacks, or even fancy brunches.
- Easy but impressive: The process is easy, yet it is presented as gourmet on a platter.
Tools You’ll Need
Here’s what I use every time (and why they matter):
- Mixing Bowls: One large for dough, one small for dry ingredients. (Makes cleanup easier.)
- Hand or Stand Mixer: For creaming butter and cheese into that fluffy base.
- Measuring Cups & Spoons (US) or Kitchen Scale (Metric): Accuracy matters here—especially for the cheese-to-flour ratio.
- Baking Sheet: A sturdy one ensures even browning.
- Parchment Paper or Silicone Baking Mat: Keeps cookies from sticking and makes cleanup painless.
- Small Spoon or Your Thumb: To make the signature center indent.
- Cooling Rack: So your cookies don’t go soggy underneath.
Ingredients
For the Dough
- 1 cup (225 g) unsalted butter, softened
- 1 ½ cups (180 g) all-purpose flour
- 1 cup (100 g) sharp cheddar cheese, finely shredded
- ½ cup (60 g) Parmesan cheese, grated
- ½ teaspoon salt
- ¼ teaspoon black pepper
- ½ teaspoon smoked paprika (optional, but gives a beautiful warmth)
- 1 teaspoon dried thyme or rosemary, finely crushed
For the Filling
- About ⅓ cup (80 g) red pepper jelly, tomato chutney, or onion jam
- Optional garnish: finely chopped herbs or a sprinkle of flaky sea salt
Step-by-Step Instructions
1. Cream the butter and cheese
In a large bowl, blend the butter and both cheeses using a hand mixer until silky and kind of fluffy. I always like looking at this moment—it’s like seeing sunshine turning into dough.
2. Combine dry ingredients
For an even distribution of all ingredients before icing, take another bowl and mix by hand flour with salt, pepper, paprika, and herbs.
3. Make the dough
Step-wise add the dry mix to the buttery mixture. With the help of a spoon or beating on low speed, continue until it forms a soft dough. Initially, it will be a bit crumbly, but using your hands to press it down, you will be rewarded with a beautiful dough that has come together.
4. Chill it
Wrap the formed dough in cling film and keep it in the refrigerator for approximately 30 minutes. It is the process of firming up butter, which will be the reason for shaping the cookies and their attractive shape even after baking.
5. Shape the cookies
350°F (175°C) is the preheating temperature of the oven you should set now. Use baking paper to cover your baking tray. Make little balls out of the dough with a diameter of about 1 inch (2.5 cm). Arrange them on the tray at around 2 inches distance from one another. Gently press your thumb or the back of a spoon to create a small indentation in the middle of each ball.
6. Add the filling
Fill each hollow with a tiny dollop (about ½ teaspoon) of your selected filling. Do not overfill—it will bubble and drip when baking.
7. Bake
The cookies will need to bake for 14 to 16 minutes or until the edges turn golden brown and the tops just begin to set. The smell in your kitchen will be a combination of a bakery and a cheese shop having a love affair.
8. Cool and serve
Let the cookie tray sit for 5 minutes, then place the cookies on the wire rack to cool down. The centers will harden during the cooling down time.
Serving Ideas
- Serve at a party with sparkling wine or rosé.
- Charcuterie board for the most unexpected thing.
- Warm with a small bowl of herbed cream cheese dip.
- Have it as a midday snack with coffee or tea (believe me, it works).
Variations and Customizations
- Cheese swap: Try gouda, gruyère, or pepper jack for different flavor vibes.
- Herb twist: Swap thyme for oregano or dill for a fresher note.
- Filling ideas:
- Caramelized onion jam for sweetness
- Fig spread for a hint of luxury
- Spicy tomato relish for a punch
- Olive tapenade for a Mediterranean flair
- Add crunch: Sprinkle chopped nuts or sesame seeds before baking.
Make-Ahead and Storage
- Make-ahead: You can form and freeze the unbaked cookie balls for up to 2 months. Just bake them straight from frozen (add 2 extra minutes to bake time).
- Storage: Keep baked cookies in an airtight container at room temperature for up to 3 days, or refrigerate for a week.
- Reheat: Pop them in the oven at 300°F (150°C) for 5 minutes to crisp back up.
Pro Tips & Mistakes to Avoid
Think of this as advice from one home baker to another:
- Use freshly grated cheese. Pre-shredded cheese has anti-caking agents that mess with texture.
- Don’t skip chilling. Warm dough = flat cookies.
- Go easy on the filling. Too much jelly will overflow.
- Use cold baking sheets. If you’re doing multiple batches, let the pan cool between rounds.
- Taste your dough. Since it’s egg-free, you can safely tweak salt or herbs before baking.
Recipe Info
Yield: About 24 cookies
Prep time: 15 minutes
Chill time: 30 minutes
Cook time: 15 minutes
Total time: 1 hour
Nutrition (per cookie):
Calories: 110 | Fat: 9g | Carbs: 5g | Protein: 3g | Sodium: 120mg
Final Thoughts
If you’ve never tried savory cookies before, these Cheesy Thumbprint Savory Cookies will change the way you think about baking. They’re warm, crumbly, and packed with flavor that hits every note—salty, buttery, tangy, and sweet. Whether you’re hosting, gifting, or just baking for yourself, I promise these will become a go-to favorite.
Cheesy Thumbprint Savory Cookies
4
servings15
minutes15
minutes110
kcalTo be honest, these are not just cookies. A shortbread-style dough treated with sharp cheese, butter, and a little bit of herbs, lighted up in the middle with a thumbprint (just as sweet cookies) and filled with something savory—imagine red pepper jelly, caramelized onion jam, or just a little of tomato chutney. They are just the right size for a snack, appetizer, or a party nibble that always makes people ask, “What is this delicious thing?”
Ingredients
For the Dough
1 cup (225 g) unsalted butter, softened
1 ½ cups (180 g) all-purpose flour
1 cup (100 g) sharp cheddar cheese, finely shredded
½ cup (60 g) Parmesan cheese, grated
½ teaspoon salt
¼ teaspoon black pepper
½ teaspoon smoked paprika (optional, but gives a beautiful warmth)
1 teaspoon dried thyme or rosemary, finely crushed
For the Filling
About ⅓ cup (80 g) red pepper jelly, tomato chutney, or onion jam
Optional garnish: finely chopped herbs or a sprinkle of flaky sea salt
Directions
- Cream the butter and cheese
- In a large bowl, blend the butter and both cheeses using a hand mixer until silky and kind of fluffy. I always like looking at this moment—it’s like seeing sunshine turning into dough.
- Combine dry ingredients
- For an even distribution of all ingredients before icing, take another bowl and mix by hand flour with salt, pepper, paprika, and herbs.
- Make the dough
- Step-wise add the dry mix to the buttery mixture. With the help of a spoon or beating on low speed, continue until it forms a soft dough. Initially, it will be a bit crumbly, but using your hands to press it down, you will be rewarded with a beautiful dough that has come together.
- Chill it
- Wrap the formed dough in cling film and keep it in the refrigerator for approximately 30 minutes. It is the process of firming up butter, which will be the reason for shaping the cookies and their attractive shape even after baking.
- Shape the cookies
- 350°F (175°C) is the preheating temperature of the oven you should set now. Use baking paper to cover your baking tray. Make little balls out of the dough with a diameter of about 1 inch (2.5 cm). Arrange them on the tray at around 2 inches distance from one another. Gently press your thumb or the back of a spoon to create a small indentation in the middle of each ball.
- Add the filling
- Fill each hollow with a tiny dollop (about ½ teaspoon) of your selected filling. Do not overfill—it will bubble and drip when baking.
- Bake
- The cookies will need to bake for 14 to 16 minutes or until the edges turn golden brown and the tops just begin to set. The smell in your kitchen will be a combination of a bakery and a cheese shop having a love affair.
- Cool and serve
- Let the cookie tray sit for 5 minutes, then place the cookies on the wire rack to cool down. The centers will harden during the cooling down time.
Notes
- Think of this as advice from one home baker to another:
Use freshly grated cheese. Pre-shredded cheese has anti-caking agents that mess with texture.
Don’t skip chilling. Warm dough = flat cookies.
Go easy on the filling. Too much jelly will overflow.
Use cold baking sheets. If you’re doing multiple batches, let the pan cool between rounds.
Taste your dough. Since it’s egg-free, you can safely tweak salt or herbs before baking.