These cheesy taco breadsticks have got to be among those recipes that really give the feel of kitchen genius without putting much effort at all. I’ve made them for family game nights, laid-back dinners, and even for lazy weekends when I just want something warm and cheesy, absurdly satisfying, and never fails. Each time, they disappear from the plates at an unbelievable speed.
A Quick Look at What This Recipe Is
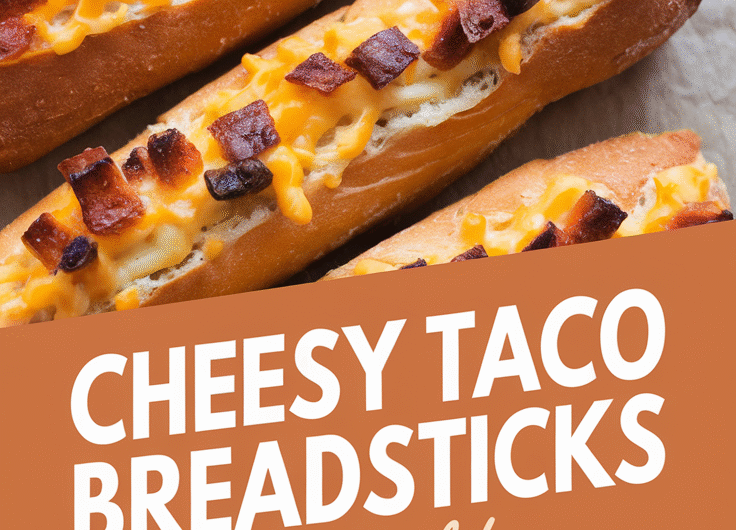
Soft, golden, stuffed breadsticks filled with seasoned taco meat and melted gooey cheese baked till they are crunchy outside and melty inside, imagine dipping them in salsa or sour cream: That is what this recipe has been made for-comfort food meets taco night in a bite.
Why This Recipe Is So Special
What I love about the breadsticks is how they can take the simplest ingredients and turn them into something extra: that aroma of taco seasoning in the oven, the pull of melted cheese when you tear one apart, and that buttery crust melts right into the mouth–that’s what comfort, flavor, and fun all rolled up into one. And you don’t have to be a pro in baking to get them right.
Why You’ll Love This Recipe
- Flavor-packed: Each bite has the perfect mix of taco seasoning, cheese, and buttery bread.
- Foolproof: Buy it at the store or make it at home-it is versatile!
- Popular: Kids, teens, adults … they love everyone.
- Functional: It’s perfect for parties, snacks, or even dinner with salad.
- Pre-preparing friendly: You can prepare and bake later and not lose freshness.
Tools You’ll Need
You don’t need fancy gear—just a few basics that make life easier:
- Baking sheet (or pizza pan): Where the magic happens. I like lining it with parchment paper for easy cleanup.
- Mixing bowl: To mix your taco filling evenly.
- Rolling pin: Helps flatten your dough, but if you don’t have one, a wine bottle works too.
- Skillet: For browning the taco meat, nonstick works best.
- Pastry brush: To spread butter or egg wash for that golden finish.
- Pizza cutter or sharp knife: For slicing the breadsticks cleanly before or after baking.
Ingredients
For the Dough (or use 1 lb/450 g store-bought pizza dough):
- 2 ¼ cups (280 g) all-purpose flour
- 1 tsp (5 g) salt
- 1 tbsp (12 g) sugar
- 2 ¼ tsp (7 g) instant yeast
- ¾ cup (180 ml) warm water
- 2 tbsp (30 ml) olive oil
For the Filling:
- ½ lb (225 g) ground beef or turkey
- 1 tbsp (15 g) taco seasoning (store-bought or homemade)
- ¼ cup (60 ml) water
- 1 cup (100 g) shredded cheddar cheese
- ½ cup (50 g) shredded mozzarella cheese
For the Topping:
- 2 tbsp (30 g) melted butter
- 1 tsp (5 g) garlic powder
- ½ tsp (2 g) dried oregano
- Fresh cilantro or parsley for garnish (optional)
Optional for Serving:
- Salsa
- Sour cream
- Guacamole
Step-by-Step Instructions
1. Make the Dough (Skip if using store-bought)
Combine in a mixing bowl warm water with sugar, and yeast. Let it stand for 5 minutes until it becomes foamy. Add flour, salt, and olive oil. Mix and mold for about 6-8 minutes until it becomes soft and elastic. Allow it to rise in warm places for 1 hour or until it more than doubles in size.
(If this sounds intimidating—don’t worry! Even if your dough isn’t perfectly smooth, it’ll still bake beautifully.)
2. Cook the Taco Filling
Brown the ground beef in a skillet over medium heat until no longer pink. Drain excess fat. Stir in taco seasoning and water; cook until thick. Allow it to cool a bit, as that will prevent melting the cheese too quickly.
3. Roll Out the Dough
Lightly flour your surface and roll out the dough into a large rectangle, about ¼ inch (0.6 cm) thick.
4. Add the Filling
Spread the taco meat evenly over half of the dough. Sprinkle both cheeses generously over the top.
5. Fold and Seal
Fold the other half of the dough over the filling like closing a book. Press down gently and seal the edges with your fingers or a fork.
6. Slice into Breadsticks
Use a pizza cutter to slice the dough into strips about 1 inch (2.5 cm) wide. You can twist them slightly for a fun shape or keep them straight.
7. Add the Buttery Topping
Mix melted butter, garlic powder, and oregano. Brush over each breadstick generously—this gives that golden, flavorful crust.
8. Bake
Transfer the breadsticks to a parchment-lined baking sheet. Bake at 400°F (200°C) for 15–18 minutes or until golden brown and puffed up.
9. Serve Warm
Once out of the oven, brush again with butter (optional but irresistible). Sprinkle chopped cilantro or parsley on top. Serve immediately with salsa, sour cream, or guacamole.
Serving Ideas
- Pair with a bowl of tomato soup or chili for a cozy dinner.
- Serve as a game-night appetizer with a trio of dips.
- Slice smaller for party finger food.
- Add a side salad to make it a full meal.
Variations and Customizations
- Spicy kick: Add diced jalapeños or hot sauce to the filling.
- Vegetarian version: Swap the meat for black beans or crumbled tofu with taco seasoning.
- Breakfast twist: Use scrambled eggs and sausage instead of beef.
- Cheese overload: Mix in pepper jack or Monterey Jack for extra meltiness.
Storage and Make-Ahead Tips
- To store: Keep leftovers in an airtight container in the fridge for up to 3 days.
- To reheat: Warm in the oven at 350°F (175°C) for 5–7 minutes to keep them crispy.
- To freeze: Place baked breadsticks in a freezer bag for up to 2 months. Reheat directly from frozen.
- Make-ahead: Assemble and refrigerate unbaked breadsticks for up to 12 hours, then bake when ready.
Pro Tips and Mistakes to Avoid
Pro Tips
- Let the filling cool before assembling so the dough doesn’t get soggy.
- Don’t overfill—too much filling makes them hard to seal.
- Always brush with butter before baking for that signature crunch and flavor.
Mistakes to Avoid
- Skipping parchment paper—it saves cleanup and prevents sticking.
- Rolling dough too thin—it can tear when folding.
- Forgetting to rest the dough—cold dough won’t stretch properly.
Recipe Summary
- Yield: 10–12 breadsticks
- Prep time: 20 minutes (plus 1 hour for dough rise if homemade)
- Cook time: 18 minutes
- Total time: 1 hour 40 minutes
- Calories per serving: ~230 kcal
Final Thoughts
There’s something magical about pulling a warm, cheesy breadstick apart and seeing that string of melted cheese stretch. These Cheesy Taco Breadsticks bring together everything you love about tacos and freshly baked bread in one bite.
Cheesy Taco Breadsticks Delight
4
servings20
minutes18
minutes230
kcalSoft, golden, stuffed breadsticks filled with seasoned taco meat and melted gooey cheese baked till they are crunchy outside and melty inside, imagine dipping them in salsa or sour cream: That is what this recipe has been made for-comfort food meets taco night in a bite.
Ingredients
For the Dough (or use 1 lb/450 g store-bought pizza dough):
2 ¼ cups (280 g) all-purpose flour
1 tsp (5 g) salt
1 tbsp (12 g) sugar
2 ¼ tsp (7 g) instant yeast
¾ cup (180 ml) warm water
2 tbsp (30 ml) olive oil
For the Filling:
½ lb (225 g) ground beef or turkey
1 tbsp (15 g) taco seasoning (store-bought or homemade)
¼ cup (60 ml) water
1 cup (100 g) shredded cheddar cheese
½ cup (50 g) shredded mozzarella cheese
For the Topping:
2 tbsp (30 g) melted butter
1 tsp (5 g) garlic powder
½ tsp (2 g) dried oregano
Fresh cilantro or parsley for garnish (optional)
Optional for Serving:
Salsa
Sour cream
Guacamole
Directions
- Make the Dough (Skip if using store-bought)
- Combine in a mixing bowl warm water with sugar, and yeast. Let it stand for 5 minutes until it becomes foamy. Add flour, salt, and olive oil. Mix and mold for about 6-8 minutes until it becomes soft and elastic. Allow it to rise in warm places for 1 hour or until it more than doubles in size.
- (If this sounds intimidating—don’t worry! Even if your dough isn’t perfectly smooth, it’ll still bake beautifully.)
- Cook the Taco Filling
- Brown the ground beef in a skillet over medium heat until no longer pink. Drain excess fat. Stir in taco seasoning and water; cook until thick. Allow it to cool a bit, as that will prevent melting the cheese too quickly.
- Roll Out the Dough
- Lightly flour your surface and roll out the dough into a large rectangle, about ¼ inch (0.6 cm) thick.
- Add the Filling
- Spread the taco meat evenly over half of the dough. Sprinkle both cheeses generously over the top.
- Fold and Seal
- Fold the other half of the dough over the filling like closing a book. Press down gently and seal the edges with your fingers or a fork.
- Slice into Breadsticks
- Use a pizza cutter to slice the dough into strips about 1 inch (2.5 cm) wide. You can twist them slightly for a fun shape or keep them straight.
- Add the Buttery Topping
- Mix melted butter, garlic powder, and oregano. Brush over each breadstick generously—this gives that golden, flavorful crust.
- Bake
- Transfer the breadsticks to a parchment-lined baking sheet. Bake at 400°F (200°C) for 15–18 minutes or until golden brown and puffed up.
- Serve Warm
- Once out of the oven, brush again with butter (optional but irresistible). Sprinkle chopped cilantro or parsley on top. Serve immediately with salsa, sour cream, or guacamole.
Notes
- Pro Tips
Let the filling cool before assembling so the dough doesn’t get soggy.
Don’t overfill—too much filling makes them hard to seal.
Always brush with butter before baking for that signature crunch and flavor.
Mistakes to Avoid
Skipping parchment paper—it saves cleanup and prevents sticking.
Rolling dough too thin—it can tear when folding.
Forgetting to rest the dough—cold dough won’t stretch properly.