The combination of caramel and apples feels like home to me. It’s possibly how sweet buttery caramel hangs onto those tart apple bites or how every spoonful simply feels like a little celebration of fall — cozy, golden, just enough indulgence. I find myself grinning every time I make these Caramel Apple Dessert Cups, before I even pop one into my mouth. Comfort food, layered with crunch, cream, and sticky sweetness.
What Are Caramel Apple Dessert Cups?
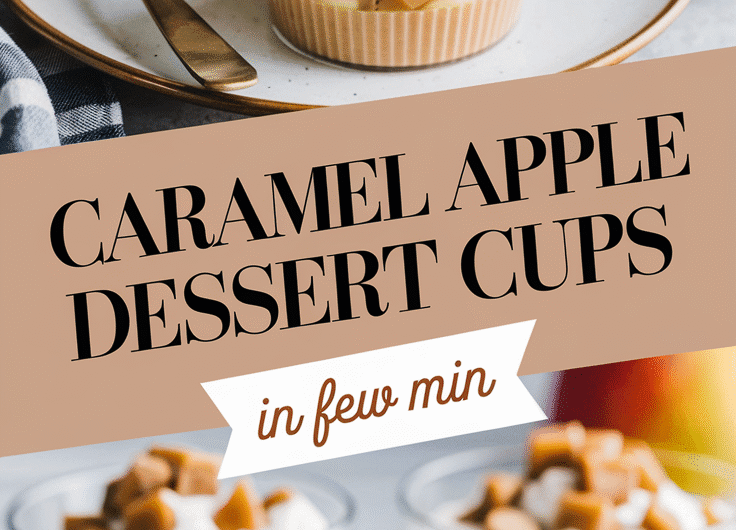
Consider a deconstructed caramel apple, but better. Instead of trying to bite through an annoyingly hard coating and a sticky apple, you just get spoonfuls of soft apple filling with cream whipped in between, all sitting on a buttery graham or cookie crust. It’s the kind of dessert that takes every bit of your taste buds and puts it in the perfect sweet-and-tart balance.
This dessert looks fancy enough for guests but is secretly easy to make — and even easier to eat.
Why This Recipe Is Special
I love this recipe because it feels like the perfect combination of nostalgia and freshness. It’s like your beloved fairground favorite met your adored no-bake dessert and decided happily ever after! The layering is stunning in terms of looks, but the real deal is It’s simple, fast, and you can make it ahead. Whether you serve it at Thanksgiving, a weekend dinner, or just because you felt like something sweet, it always gets people talking.
Why You’ll Love This Recipe
- Quick and easy: You’ll have these ready in about 30 minutes — no oven needed.
- Customizable: Swap the crust, change the apples, or drizzle on extra caramel — you can’t go wrong.
- Perfect for entertaining: They look beautiful in cups, jars, or dessert glasses.
- Make-ahead friendly: Chill them overnight for even better flavor.
- All-season favorite: Cozy for fall, but light enough for summer too.
Tools You’ll Need
You don’t need fancy kitchen gear here — just your basics and a few handy helpers:
- Medium saucepan: For cooking down the apple filling until soft and caramelized.
- Mixing bowls: One for the crust, one for the whipped layer.
- Spatula: Helps fold ingredients gently without deflating the cream.
- Electric mixer or whisk: For whipping the cream to soft peaks (your arm will thank you).
- Serving cups or jars: Small glass cups or 8-ounce jars make these look adorable.
- Measuring cups & spoons: Accuracy matters, especially for the crust and caramel ratio.
Ingredients (Makes 6 Cups)
For the Apple Layer
- 3 medium apples (about 450 g), peeled, cored, and chopped
- 2 tbsp (25 g) unsalted butter
- 2 tbsp (25 g) brown sugar
- 1 tsp (5 ml) lemon juice
- ½ tsp ground cinnamon
- Pinch of salt
For the Crust
- 1 cup (100 g) graham cracker crumbs or crushed digestive biscuits
- 3 tbsp (45 g) melted butter
- 1 tbsp (12 g) sugar
For the Cream Layer
- 1 cup (240 ml) heavy whipping cream
- 2 tbsp (25 g) powdered sugar
- ½ tsp vanilla extract
For the Caramel Sauce
- ½ cup (100 g) granulated sugar
- 2 tbsp (30 ml) water
- 3 tbsp (45 g) unsalted butter, cubed
- ¼ cup (60 ml) heavy cream
- Pinch of salt
(Or, you can use your favorite store-bought caramel if you want to save time — I won’t judge!)
Step-by-Step Instructions
1. Cook the Apple Filling
In a small saucepan and melt the butter over a medium flame. Add chopped apples, brown sugar, lemon juice, cinnamon, and a pinch of salt. Stir occasionally for 8 to 10 minutes until the apples soften glossy. You can tell they are ready when it smells like warm apple pie in your kitchen. Let cool.
2. Make the Crust
In a small bowl, combine crumbly graham crackers, leftover from melting butter and sugar together until it feels like wet sand. A few spoonfuls of the crumbly mixture should be pressed into each serving cup bottom. Gently tap the cups to even out crusts. Tag the cups along into the fridge while you make your way through all the other layers prepared.
3. Whip the Cream
Beat heavy cream and powdered sugar with vanilla in a clear bowl until soft peaks form. Do not overwhip; you want smooth and airy, not whipped butter.
4. Make the Caramel
In a saucepan, add the sugar to the water over medium heat. Don’t stir – just swish the pan around every now and then. After it will take the color of golden amber, take it off the heat, quickly whisk in butter, and pour in cream slowly. It will bubble, that’s normal! Stir until smooth and then add salt. Let it cool down a little before layering.
5. Assemble the Cups
Now for the fun part. Spoon a layer of apple filling over the crust. Add a layer of whipped cream, then drizzle caramel over the top. Repeat once more if your cups are tall enough. Finish with extra caramel and a tiny apple slice or crushed nuts for garnish.
6. Chill and Serve
Refrigerate for at least 30 minutes so the layers can settle and the caramel slightly thickens. Serve cold or slightly chilled — it’s delicious either way.
Serving Ideas
- For the crunch factor, top it off with toasted pecans or granola.
- Make it a salted caramel by adding a few sprinkles of sea salt.
- If you are feeling a little extra, add a scoop of vanilla ice cream.
- Layer in some spiced cake crumbs for an even more festive dessert cup.
Variations & Customizations
- No-modification: Coconut cream and dairy-free caramel are good substitutions.
- Crumblers: Replace the graham crust with baked crumble topping.
- Instead, swap apple for pear or peach to give it a fruity twist.
- Little Shots: Make them in shot glasses for parties.
Storage & Make-Ahead Tips
- Make-ahead: Can be assembled and refrigerated for up to 24 hours.
- Storage: Covered in the refrigerator for a maximum of 3 days.
- Freezer: Not recommended-the cream layer doesn’t hold texture once thawed.
Pro Tips (and Mistakes to Avoid)
- Use firm apples: Honeycrisp or Granny Smith hold their shape best when cooked.
- Don’t rush the caramel: If it burns, it’ll taste bitter — keep the heat medium and stay close.
- Cool layers before assembling: Warm apples or caramel will melt the cream.
- Layer smartly: Start with crust, then apples, then cream — this keeps it looking neat.
- Double the caramel: Trust me, you’ll want extra for drizzling.
Recipe Details
- Yield: 6 servings
- Prep Time: 15 minutes
- Cook Time: 15 minutes
- Total Time: 30 minutes
- Per Serving (approx):
- Calories: 320
- Fat: 18 g
- Carbs: 38 g
- Protein: 3 g
Final Thoughts
These Caramel Apple Dessert Cups are the types of desserts that make an ordinary moment special. This is cloyingly lovely, very comforting, and just messy enough to seem homemade-the sort of dessert you’ll immediately have a craving for the moment the spoon scrapes its way to the bottom of the cup.
Caramel Apple Dessert Cups
4
servings15
minutes15
minutes320
kcalConsider a deconstructed caramel apple, but better. Instead of trying to bite through an annoyingly hard coating and a sticky apple, you just get spoonfuls of soft apple filling with cream whipped in between, all sitting on a buttery graham or cookie crust. It's the kind of dessert that takes every bit of your taste buds and puts it in the perfect sweet-and-tart balance.
Ingredients
3 medium apples (about 450 g), peeled, cored, and chopped
2 tbsp (25 g) unsalted butter
2 tbsp (25 g) brown sugar
1 tsp (5 ml) lemon juice
½ tsp ground cinnamon
Pinch of salt
For the Crust
1 cup (100 g) graham cracker crumbs or crushed digestive biscuits
3 tbsp (45 g) melted butter
1 tbsp (12 g) sugar
For the Cream Layer
1 cup (240 ml) heavy whipping cream
2 tbsp (25 g) powdered sugar
½ tsp vanilla extract
For the Caramel Sauce
½ cup (100 g) granulated sugar
2 tbsp (30 ml) water
3 tbsp (45 g) unsalted butter, cubed
¼ cup (60 ml) heavy cream
Pinch of salt
Directions
- Cook the Apple Filling
- In a small saucepan and melt the butter over a medium flame. Add chopped apples, brown sugar, lemon juice, cinnamon, and a pinch of salt. Stir occasionally for 8 to 10 minutes until the apples soften glossy. You can tell they are ready when it smells like warm apple pie in your kitchen. Let cool.
- Make the Crust
- In a small bowl, combine crumbly graham crackers, leftover from melting butter and sugar together until it feels like wet sand. A few spoonfuls of the crumbly mixture should be pressed into each serving cup bottom. Gently tap the cups to even out crusts. Tag the cups along into the fridge while you make your way through all the other layers prepared.
- Whip the Cream
- Beat heavy cream and powdered sugar with vanilla in a clear bowl until soft peaks form. Do not overwhip; you want smooth and airy, not whipped butter.
- Make the Caramel
- In a saucepan, add the sugar to the water over medium heat. Don't stir - just swish the pan around every now and then. After it will take the color of golden amber, take it off the heat, quickly whisk in butter, and pour in cream slowly. It will bubble, that's normal! Stir until smooth and then add salt. Let it cool down a little before layering.
- Assemble the Cups
- Now for the fun part. Spoon a layer of apple filling over the crust. Add a layer of whipped cream, then drizzle caramel over the top. Repeat once more if your cups are tall enough. Finish with extra caramel and a tiny apple slice or crushed nuts for garnish.
- Chill and Serve
- Refrigerate for at least 30 minutes so the layers can settle and the caramel slightly thickens. Serve cold or slightly chilled — it’s delicious either way.
Notes
- Use firm apples: Honeycrisp or Granny Smith hold their shape best when cooked.
Don’t rush the caramel: If it burns, it’ll taste bitter — keep the heat medium and stay close.
Cool layers before assembling: Warm apples or caramel will melt the cream.
Layer smartly: Start with crust, then apples, then cream — this keeps it looking neat.
Double the caramel: Trust me, you’ll want extra for drizzling.