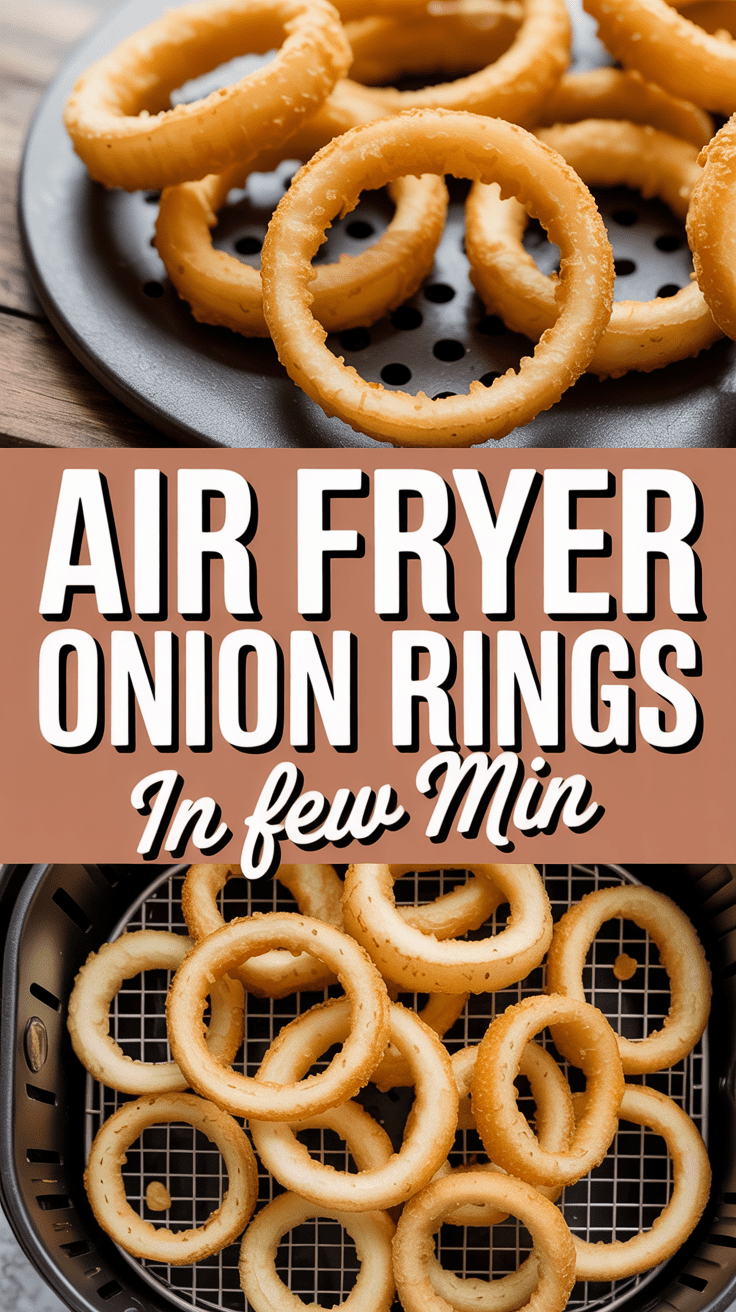
There’s just something about a basket overflowing with golden, crispy onion rings that instantly brings a smile to my face. The crunch could be the reason—the very first bite is so satisfying!—or the way the sweet, soft onion inside goes so well with the salty, seasoned coating, which is somehow nothing but perfect. I’ve cooked my share of onion rings by now, but after I got to know them through the air fryer, there was no going back. These air fryer onion rings are totally the same as the classic ones in my opinion—crispy, tasty, and completely addictive—only without all the grease mess.
What Are Air Fryer Onion Rings?
Onion rings prepared in the air fryer will be a bit lighter and quicker than those deep-fried favorites. Each ring will not be dipped in the bubbling oil; instead, you let the hot air circulating around each piece do the work, turning them golden and crisp. The result? What you get is the same pleasing texture, just no heaviness.
Why This Recipe Is Special
Crispy but not dry, flavorful but not greasy is the best way to describe this recipe. I used different coatings in order to get the same crunch that lasts, even after cooling down a bit (if they can last that long). Besides, the air fryer makes them taste just like fry and your kitchen will not be smelling like an oil-slicked zone.
Why You’ll Love This Recipe
- Crispy Texture Without the Oil: Perfect golden crunch without the deep-frying.
- Simple Ingredients: All are easy to find in the pantry and friendly.
- Healthier Alternative: Less oil means fewer calories and no guilt.
- Quick and Easy: From prep to plate in under 30 minutes.
- Kid-Approved: These rings are fun to make and even more fun to eat.
Tools You’ll Need
Here’s what I use to make perfect onion rings every time:
- Air Fryer: The star of the show. I use a 4-quart model, but any size works—just adjust batches accordingly.
- Mixing Bowls: You’ll need three—one for flour, one for egg wash, and one for breadcrumbs.
- Tongs: Perfect for flipping and handling the coated rings without making a mess.
- Parchment Paper (optional): Keeps the air fryer basket clean and prevents sticking.
- Cooling Rack: Helps keep the rings crisp while you cook the next batch.
Ingredients (US & Metric)
- 2 large yellow onions, cut into ½-inch thick rings
- ¾ cup all-purpose flour (95 g)
- 1 teaspoon paprika
- ½ teaspoon garlic powder
- ½ teaspoon salt
- ¼ teaspoon black pepper
- 2 large eggs, beaten
- 1 tablespoon milk (15 ml)
- 1½ cups panko breadcrumbs (90 g) – for that extra crunch
- Cooking spray (olive oil or avocado oil)
Optional: a pinch of cayenne or chili powder if you like a kick.
Step-by-Step Instructions
1. Prepare the Onions
First off, get rid of the outer layers of the onions and cut them into half-inch thick circles. Gently pull apart the onion rings. The smaller ones in the middle are good for soups or stir fries; I keep them for this reason since they are hard to coat evenly.
2. Set Up Your Coating Station
Grab three bowls:
- Bowl 1: Combine flour, paprika, garlic powder, salt, and pepper.
- Bowl 2: Beat eggs and milk together until creamy.
- Bowl 3: Put panko crumbs in.
Think of this like a little assembly line—flour, egg, breadcrumbs, done.
3. Coat the Onion Rings
Take each onion ring, flour it (pour off the extra), then put it in the egg wash, and finally coat it with the breadcrumbs. I press lightly so the crumbs adhere more. Don’t be in a hurry—make sure every ring gets coated evenly take your time.
4. Preheat the Air Fryer
To 375°F (190°C) and keep it on for about 3 minutes. It is a long wait—but preheating helps the first batch come out perfectly crisp.
5. Arrange the Onion Rings
With cooking oil spray just a little bit the air fryer basket. The rings should be placed in one layer—no overlapping! When they overlap, they will be steaming instead of crisp.
6. Air Fry Until Golden
Cook for 8–10 minutes and flip them over halfway through. After 7 minutes start checking on them; every air fryer is a bit different. They need to be golden and crisp—beautifully so.
7. Serve Hot and Enjoy
Just one minute of cooling on a rack (they will become even crispier while cooling) and then just go for it.
Serving Ideas
- Classic: Ketchup, Ranch, or any of your favorite dipping sauces.
- Loaded: Topped with shredded cheese and a drizzle of spicy mayo.
- Burger Sidekick: Served with homemade hamburgers or grilled sandwiches.
- Game Day Snack: Include them in your snack platter with fries and wings.
Variations and Customizations
- Gluten-Free: Rice flour and gluten-free breadcrumbs.
- Spicy Kick: Add cayenne or hot sauce to the batter.
- Cheesy Coating: Mix grated Parmesan into the breadcrumbs.
- Sweet Twist: Try using sweet onions like Vidalia for a milder flavor.
Storage and Make-Ahead
- To Store: Keep leftovers in an airtight container in the fridge for up to 3 days.
- To Reheat: Air fry at 350°F (175°C) for 3–4 minutes until crisp again.
- To Make Ahead: You can coat the onion rings, place them on a baking sheet, and freeze. Once frozen, transfer to a zip bag. Cook straight from frozen, adding 2–3 minutes to the time.
Pro Tips (and Mistakes to Avoid)
Here’s where I share the little things I’ve learned the hard way:
- Don’t skip the preheat: It makes a huge difference in texture.
- Use panko, not regular breadcrumbs: They’re lighter and crispier.
- Avoid crowding: Overlapping rings won’t crisp evenly. Cook in batches—it’s worth it.
- Spray lightly: Too much oil spray can make the coating soggy.
- Flip halfway through: This helps get both sides perfectly golden.
Recipe Info
- Yield: About 4 servings
- Prep Time: 15 minutes
- Cook Time: 10 minutes
- Total Time: 25 minutes
Nutrition (Per Serving)
- Calories: 210
- Protein: 6 g
- Fat: 5 g
- Carbohydrates: 35 g
- Fiber: 2 g
- Sodium: 250 mg
Final Thoughts
Making onion rings in the air fryer is one of those small kitchen wins that feels big. You get all the crunch, flavor, and satisfaction of the deep-fried version—without the splatter, the oil smell, or the cleanup. Once you try these, you’ll never crave the frozen bagged ones again.

Air Fryer Onion Rings
4
servings15
minutes10
minutes210
kcalOnion rings prepared in the air fryer will be a bit lighter and quicker than those deep-fried favorites. Each ring will not be dipped in the bubbling oil; instead, you let the hot air circulating around each piece do the work, turning them golden and crisp. The result? What you get is the same pleasing texture, just no heaviness.
Ingredients
2 large yellow onions, cut into ½-inch thick rings
¾ cup all-purpose flour (95 g)
1 teaspoon paprika
½ teaspoon garlic powder
½ teaspoon salt
¼ teaspoon black pepper
2 large eggs, beaten
1 tablespoon milk (15 ml)
1½ cups panko breadcrumbs (90 g) – for that extra crunch
Cooking spray (olive oil or avocado oil)
Optional: a pinch of cayenne or chili powder if you like a kick.
Directions
- Prepare the Onions
- First off, get rid of the outer layers of the onions and cut them into half-inch thick circles. Gently pull apart the onion rings. The smaller ones in the middle are good for soups or stir fries; I keep them for this reason since they are hard to coat evenly.
- Set Up Your Coating Station
- Grab three bowls:
- Bowl 1: Combine flour, paprika, garlic powder, salt, and pepper.
- Bowl 2: Beat eggs and milk together until creamy.
- Bowl 3: Put panko crumbs in.
- Think of this like a little assembly line—flour, egg, breadcrumbs, done.
- Coat the Onion Rings
- Take each onion ring, flour it (pour off the extra), then put it in the egg wash, and finally coat it with the breadcrumbs. I press lightly so the crumbs adhere more. Don’t be in a hurry—make sure every ring gets coated evenly take your time.
- Preheat the Air Fryer
- To 375°F (190°C) and keep it on for about 3 minutes. It is a long wait—but preheating helps the first batch come out perfectly crisp.
- Arrange the Onion Rings
- With cooking oil spray just a little bit the air fryer basket. The rings should be placed in one layer—no overlapping! When they overlap, they will be steaming instead of crisp.
- Air Fry Until Golden
- Cook for 8–10 minutes and flip them over halfway through. After 7 minutes start checking on them; every air fryer is a bit different. They need to be golden and crisp—beautifully so.
- Serve Hot and Enjoy
- Just one minute of cooling on a rack (they will become even crispier while cooling) and then just go for it.
Notes
- Here’s where I share the little things I’ve learned the hard way:
Don’t skip the preheat: It makes a huge difference in texture.
Use panko, not regular breadcrumbs: They’re lighter and crispier.
Avoid crowding: Overlapping rings won’t crisp evenly. Cook in batches—it’s worth it.
Spray lightly: Too much oil spray can make the coating soggy.
Flip halfway through: This helps get both sides perfectly golden.