Homemade Masa Cheese Pupusas
I’ve always had a soft spot for recipes that turn simple ingredients into something unforgettable, and pupusas fit that perfectly. Every time I make them, I’m reminded of how comforting warm masa and gooey cheese can be, especially when you tear one open and the steam hits your face. If you’ve never made them at home, you’re in for something genuinely fun and surprisingly relaxing.
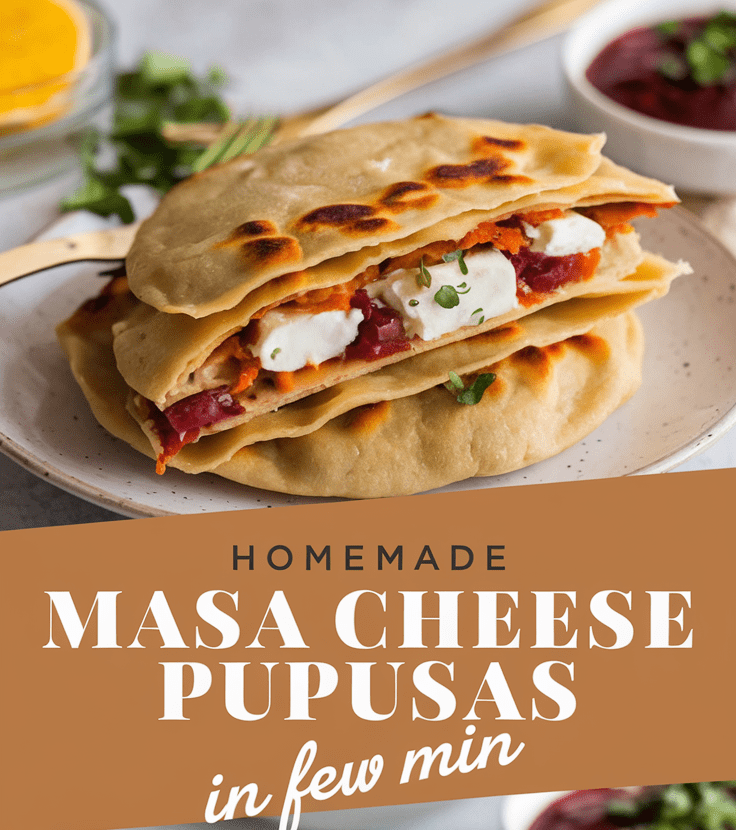
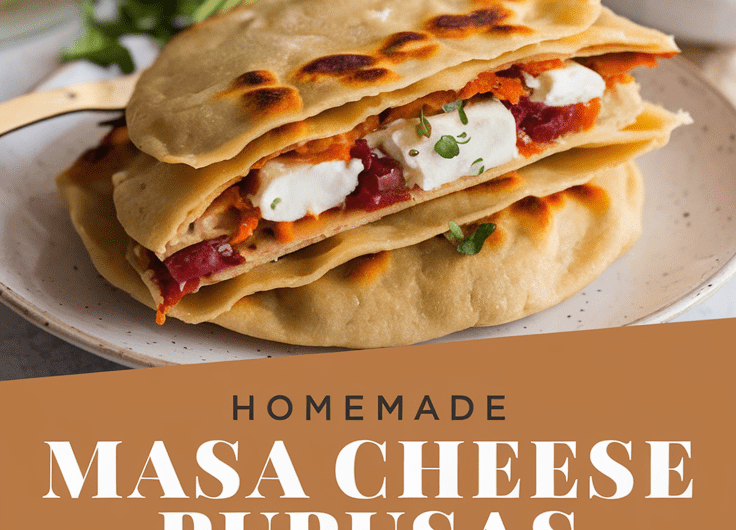
Pupusas are traditional Salvadoran stuffed masa cakes, usually filled with cheese, beans, or seasoned meats. The version I share here focuses on cheese because it’s the easiest place to start, and honestly, it delivers more joy than you’d expect from such humble ingredients. You mix a dough, shape it with your hands, tuck in the cheese, and cook them until the edges crisp up. It’s hands-on, rhythmic, and satisfying.
What makes this recipe special is that you get big flavor without complicated steps. The outside turns lightly crispy while the inside stays soft and cheesy. And because you’re shaping them by hand, they naturally develop their own personality. Perfect circles are not required—imperfection is part of the charm.
Why You’ll Love This Recipe
- Easy dough that comes together with just water and masa
- Comforting cheese filling that melts into a stretchy center
- A hands-on cooking experience that feels grounding and fun
- Naturally gluten-free and customizable
- Perfect for weeknights, weekends, or feeding a group
Tools You’ll Need
- Mixing bowl
- Helps you hydrate the masa evenly. Any medium bowl works.
- Measuring cups or a kitchen scale
- Makes sure your dough has the right ratio of water to masa.
- Cast iron skillet or nonstick pan
- Gives you the best golden, crisp edges without sticking.
- Spatula
- For flipping the pupusas without tearing them.
- Small bowl of warm water
- You’ll use this to wet your hands so the masa doesn’t stick.
Ingredients (US + Metric)
Dough
- 2 cups masa harina (240 g)
- 1.5 to 1.75 cups warm water (360–420 ml)
- 1/2 teaspoon salt (3 g)
Cheese Filling
- 1.5 cups shredded mozzarella or Oaxaca cheese (150 g)
- Optional: 1–2 tablespoons finely diced jalapeño or cooked beans
Prep, Cook, and Yield
- Prep time: 15 minutes
- Cook time: 10–12 minutes
- Total time: about 25 minutes
- Yield: 8 medium pupusas
How to Make Homemade Masa Cheese Pupusas
Step-by-Step Instructions
- Mix the dough
- Add masa harina and salt to a bowl. Pour in 1.5 cups warm water and stir with your hand. You’ll feel it come together like soft clay. If it feels crumbly, add a tablespoon of water at a time. You’re looking for a dough that feels smooth, not sticky.
- Let the dough rest
- Give it about 5 minutes. This helps the masa fully hydrate so it’s easier to shape.
- Prepare your filling
- Add the cheese to a bowl. I sometimes mix mozzarella and a bit of Oaxaca for an extra stretchy middle. You can spice things up with jalapeños, but you don’t have to.
- Shape the dough balls
- Wet your hands lightly. Grab a handful of dough about the size of a golf ball. Roll it gently until smooth. Repeat until you’ve made all 8 portions.
- Create a pocket
- Hold one dough ball in your palm and press your thumb into the center to form a small well. Rotate and widen the well using your fingers. Don’t stress if the edges crack—you can smooth them with wet fingers.
- Add the cheese
- Scoop about 1–2 tablespoons of cheese into the well. I like to overfill slightly because the little leaks on the griddle make delicious crispy bits.
- Seal the pupusa
- Pinch the top closed and gently press it back into a disc. Aim for a 1/4-inch thickness. If the dough sticks to your fingers, dip your hands again in water.
- Heat your pan
- Set a skillet over medium heat. No oil needed. The dry heat gives the pupusas their signature texture.
- Cook the pupusas
- Place 2–3 pupusas on the hot pan. Cook for 3–4 minutes per side. You want light golden spots and a little puffing. When cheese starts to peek out, you know they’re ready.
- Cool slightly before serving
- Let them rest for 1–2 minutes so the cheese settles. This also makes them easier to pick up.
Serving Ideas
- Top with curtido (fermented cabbage slaw)
- Add a spoonful of salsa roja
- Serve alongside eggs for breakfast
- Enjoy with avocado slices and lime juice
- Use as a base for beans or shredded chicken
Variations and Customizations
- Bean and cheese: Mash pinto or black beans and mix with cheese.
- Jalapeño cheese: Add chopped jalapeño for mild heat.
- Loroco: Traditional Salvadoran flower buds that add a grassy, fresh flavor.
- Chorizo cheese: Fry chorizo, cool it slightly, and mix with cheese.
Storage and Make-Ahead
- Refrigerate cooked pupusas for up to 3 days in an airtight container.
- Reheat in a skillet for best texture.
- Freeze uncooked pupusas between parchment sheets. Cook from frozen—just add an extra minute per side.
- You can mix the dough up to 24 hours ahead. Keep it covered with a damp towel in the fridge.
Pro Tips and Mistakes to Avoid
- Keep a small bowl of water nearby. Dry hands make the dough crack.
- Don’t overwork the dough. If you knead too much, the masa turns gummy.
- If the filling leaks out, don’t worry—it creates delicious, crispy cheese edges.
- If the dough tears when shaping, patch it with a little extra dough and smooth it with wet fingers.
- Use warm water, not cold, because it hydrates the masa more evenly and quickly.
Nutrition (Per Pupusa)
Approximate values
Calories: 180
Protein: 7 g
Carbs: 22 g
Fat: 6 g
Fiber: 2 g
I hope you give these homemade masa cheese pupusas a try. They’re comforting, simple, and the perfect way to bring a little warmth into your kitchen. If you make them, feel free to share your experience or any twists you added—I’d love to hear how they turn out for you.
Homemade Masa Cheese Pupusas
15
minutes10
minutes180
kcalPupusas are traditional Salvadoran stuffed masa cakes, usually filled with cheese, beans, or seasoned meats. The version I share here focuses on cheese because it’s the easiest place to start, and honestly, it delivers more joy than you’d expect from such humble ingredients. You mix a dough, shape it with your hands, tuck in the cheese, and cook them until the edges crisp up. It’s hands-on, rhythmic, and satisfying.
Ingredients
Dough
2 cups masa harina (240 g)
1.5 to 1.75 cups warm water (360–420 ml)
1/2 teaspoon salt (3 g)
Cheese Filling
1.5 cups shredded mozzarella or Oaxaca cheese (150 g)
Optional: 1–2 tablespoons finely diced jalapeño or cooked beans
Directions
- Mix the dough
- Add masa harina and salt to a bowl. Pour in 1.5 cups warm water and stir with your hand. You’ll feel it come together like soft clay. If it feels crumbly, add a tablespoon of water at a time. You’re looking for a dough that feels smooth, not sticky.
- Let the dough rest
- Give it about 5 minutes. This helps the masa fully hydrate so it’s easier to shape.
- Prepare your filling
- Add the cheese to a bowl. I sometimes mix mozzarella and a bit of Oaxaca for an extra stretchy middle. You can spice things up with jalapeños, but you don’t have to.
- Shape the dough balls
- Wet your hands lightly. Grab a handful of dough about the size of a golf ball. Roll it gently until smooth. Repeat until you’ve made all 8 portions.
- Create a pocket
- Hold one dough ball in your palm and press your thumb into the center to form a small well. Rotate and widen the well using your fingers. Don’t stress if the edges crack—you can smooth them with wet fingers.
- Add the cheese
- Scoop about 1–2 tablespoons of cheese into the well. I like to overfill slightly because the little leaks on the griddle make delicious crispy bits.
- Seal the pupusa
- Pinch the top closed and gently press it back into a disc. Aim for a 1/4-inch thickness. If the dough sticks to your fingers, dip your hands again in water.
- Heat your pan
- Set a skillet over medium heat. No oil needed. The dry heat gives the pupusas their signature texture.
- Cook the pupusas
- Place 2–3 pupusas on the hot pan. Cook for 3–4 minutes per side. You want light golden spots and a little puffing. When cheese starts to peek out, you know they’re ready.
- Cool slightly before serving
- Let them rest for 1–2 minutes so the cheese settles. This also makes them easier to pick up.
Notes
- Keep a small bowl of water nearby. Dry hands make the dough crack.
Don’t overwork the dough. If you knead too much, the masa turns gummy.
If the filling leaks out, don’t worry—it creates delicious, crispy cheese edges.
If the dough tears when shaping, patch it with a little extra dough and smooth it with wet fingers.
Use warm water, not cold, because it hydrates the masa more evenly and quickly.