There’s just something magical about Halloween baking—it’s playful, colorful, and just the right mix of spooky and sweet. I have to say, these Halloween Pinwheel Cookies are one of my absolute favorite treats to make this time of year. They’re like edible swirls of Halloween spirit—orange and black spirals that look impressive but are secretly very easy to pull off. Every time I bring a batch to a party, they disappear faster than I can say “trick or treat.”
What Are Halloween Pinwheel Cookies?
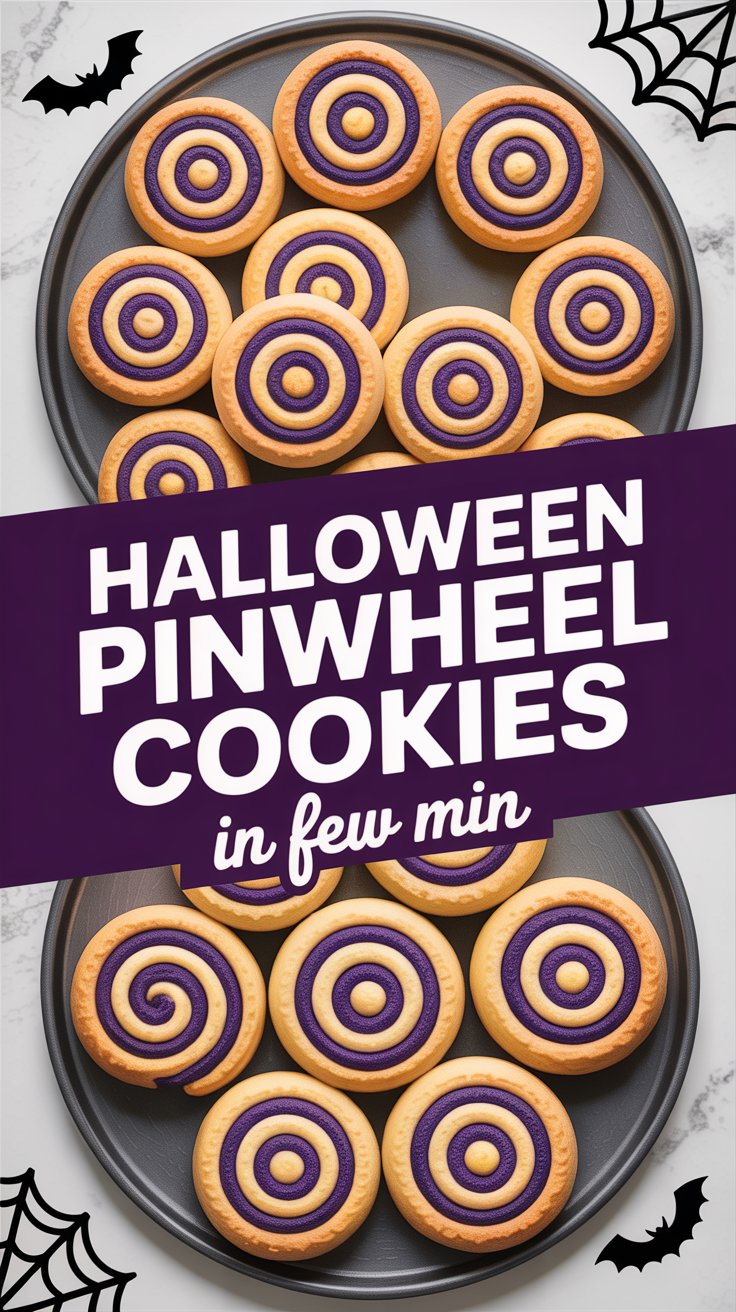
Halloween Pinwheel Cookies are buttery sugar cookies dyed in festive Halloween colors, rolled into a log, chilled, and sliced into beautiful spirals. They bake up tender with slightly crisp edges and melt-in-your-mouth centers. You can keep them simple with just the swirl, or coat the edges in colorful sprinkles for extra fun.
Why This Recipe Is Special
I’ve tried a lot of cookie recipes, but these stand out because they combine eye-catching design with buttery, vanilla flavor. You don’t need fancy cutters or molds—just a rolling pin, food coloring, and a little patience. Plus, you can prep them ahead of time and slice-and-bake whenever you’re ready. It’s the perfect recipe for baking with kids or impressing friends at your Halloween gathering.
Why You’ll Love This Recipe
- Festive and fun: The orange and black swirl makes them instantly scream Halloween.
- Simple ingredients: You probably have everything you need in your pantry already.
- Make-ahead friendly: You can chill or freeze the dough until you’re ready to bake.
- Customizable: Change the colors, add flavors, or coat with sprinkles.
- Perfect for parties: They travel well and look amazing on dessert tables.
Tools You’ll Need
You don’t need anything fancy here—just your basic cookie-making setup:
- Mixing bowls: One large and one medium for combining wet and dry ingredients.
- Electric mixer (hand or stand): To cream the butter and sugar until fluffy.
- Measuring cups and spoons: Accuracy matters for that perfect texture.
- Rubber spatula: Helps scrape down the sides and combine everything smoothly.
- Rolling pin: To roll out the dough evenly before layering.
- Plastic wrap or parchment paper: Keeps the dough from sticking and helps with rolling.
- Sharp knife: For slicing the dough log into even rounds.
- Baking sheets: Line them with parchment for easy cleanup.
Ingredients
(Makes about 24 cookies)
- 2 1/2 cups (315 g) all-purpose flour – Gives structure to the cookies.
- 1/2 teaspoon baking powder – Adds a little lift.
- 1/4 teaspoon salt – Balances sweetness.
- 3/4 cup (170 g) unsalted butter, softened – For that rich, buttery flavor.
- 3/4 cup (150 g) granulated sugar – Sweetens and helps the cookies brown.
- 1 large egg – Binds everything together.
- 1 teaspoon vanilla extract – Adds warmth and aroma.
- Orange and black gel food coloring – For that perfect Halloween swirl.
- Optional: Halloween sprinkles for coating the edges.
Step-by-Step Instructions
1. Mix the dry ingredients
In a medium bowl, whisk together flour, baking powder, and salt. Set aside.
2. Cream the butter and sugar
In a large bowl, beat the butter and sugar with an electric mixer on medium speed until light and fluffy—about 2 to 3 minutes. This step is key to getting soft cookies, so don’t rush it.
3. Add the egg and vanilla
Mix in the egg and vanilla until fully combined. The mixture should look creamy and smooth.
4. Combine wet and dry ingredients
Gradually add the flour mixture to the butter mixture, mixing just until a dough forms. Don’t overmix here—stop as soon as the flour disappears.
5. Divide and color the dough
Split the dough into two equal halves. Tint one half orange and the other black using gel food coloring. I like to knead the color in with my hands (wear gloves if you don’t want spooky fingers).
6. Roll out the dough
Roll each colored dough into a rectangle about 1/4 inch thick. Try to keep the sizes similar—it’ll make layering easier later.
7. Stack and roll
Place the black dough on top of the orange one (or vice versa), trimming the edges so they’re even. Then, using the parchment to help, gently roll the dough into a tight log. Wrap it in plastic wrap and chill for at least 2 hours (or overnight). Chilling helps the dough slice cleanly.
8. Preheat and prep
When ready to bake, preheat your oven to 350°F (175°C). Line baking sheets with parchment paper.
9. Slice and bake
Unwrap the chilled dough and use a sharp knife to slice it into 1/4-inch thick rounds. If you want extra flair, roll the edges in sprinkles before placing them on the baking sheet.
Bake for 10–12 minutes or until the edges are just set but not browned. They’ll continue to firm up as they cool.
10. Cool and serve
Let cookies cool on the baking sheet for a few minutes, then transfer them to a wire rack. Try not to eat them all before they’re fully cool—I fail at that part every time.
Serving Ideas
- Arrange them on a Halloween dessert platter with candy corn and brownies.
- Pack them in treat bags for school or office parties.
- Serve with hot cocoa, apple cider, or pumpkin spice lattes for cozy vibes.
Variations and Customizations
- Different colors: Try purple and green for a witchy twist or orange and white for pumpkins.
- Flavor upgrades: Add almond extract, orange zest, or a touch of cinnamon.
- Chocolate version: Replace 2 tablespoons of flour with cocoa powder in the black dough for a rich chocolate swirl.
- Gluten-free option: Use a 1:1 gluten-free flour blend.
Storage and Make-Ahead Tips
- At room temperature: Store in an airtight container for up to 5 days.
- In the fridge: Dough logs can be refrigerated for up to 3 days before baking.
- Freezer: Wrap tightly and freeze for up to 2 months. Slice and bake straight from the freezer—just add an extra minute to the bake time.
Pro Tips and Mistakes to Avoid
- Use gel food coloring, not liquid. Liquid adds too much moisture and makes the dough sticky.
- Chill thoroughly. If your dough is too soft, your swirls will smear when slicing.
- Trim the edges before rolling. Even edges make a perfect spiral.
- Use parchment to roll. It keeps the dough from tearing and helps create a tight log.
- Don’t overbake. The cookies should be pale with just a hint of golden color underneath.
Recipe Information
- Yield: 24 cookies
- Prep time: 25 minutes
- Chill time: 2 hours
- Cook time: 12 minutes
- Total time: 2 hours 37 minutes
Per Cookie (approximate):
Calories: 120 | Fat: 6g | Carbs: 15g | Sugar: 7g | Protein: 1g
Halloween Pinwheel Cookies
24
servings25
minutes2
hours120
kcalHalloween Pinwheel Cookies are buttery sugar cookies dyed in festive Halloween colors, rolled into a log, chilled, and sliced into beautiful spirals. They bake up tender with slightly crisp edges and melt-in-your-mouth centers. You can keep them simple with just the swirl, or coat the edges in colorful sprinkles for extra fun.
Ingredients
2 1/2 cups (315 g) all-purpose flour – Gives structure to the cookies.
1/2 teaspoon baking powder – Adds a little lift.
1/4 teaspoon salt – Balances sweetness.
3/4 cup (170 g) unsalted butter, softened – For that rich, buttery flavor.
3/4 cup (150 g) granulated sugar – Sweetens and helps the cookies brown.
1 large egg – Binds everything together.
1 teaspoon vanilla extract – Adds warmth and aroma.
Orange and black gel food coloring – For that perfect Halloween swirl.
Optional: Halloween sprinkles for coating the edges.
Directions
- In a medium bowl, whisk together flour, baking powder, and salt. Set aside.
- In a large bowl, beat the butter and sugar with an electric mixer on medium speed until light and fluffy—about 2 to 3 minutes. This step is key to getting soft cookies, so don’t rush it.
- Mix in the egg and vanilla until fully combined. The mixture should look creamy and smooth.
- Gradually add the flour mixture to the butter mixture, mixing just until a dough forms. Don’t overmix here—stop as soon as the flour disappears.
- Split the dough into two equal halves. Tint one half orange and the other black using gel food coloring. I like to knead the color in with my hands (wear gloves if you don’t want spooky fingers).
- Roll each colored dough into a rectangle about 1/4 inch thick. Try to keep the sizes similar—it’ll make layering easier later.
- Place the black dough on top of the orange one (or vice versa), trimming the edges so they’re even. Then, using the parchment to help, gently roll the dough into a tight log. Wrap it in plastic wrap and chill for at least 2 hours (or overnight). Chilling helps the dough slice cleanly.
- When ready to bake, preheat your oven to 350°F (175°C). Line baking sheets with parchment paper.
- Unwrap the chilled dough and use a sharp knife to slice it into 1/4-inch thick rounds. If you want extra flair, roll the edges in sprinkles before placing them on the baking sheet.
- Bake for 10–12 minutes or until the edges are just set but not browned. They’ll continue to firm up as they cool.
- Let cookies cool on the baking sheet for a few minutes, then transfer them to a wire rack. Try not to eat them all before they’re fully cool—I fail at that part every time.
Notes
- Use gel food coloring, not liquid. Liquid adds too much moisture and makes the dough sticky.
Chill thoroughly. If your dough is too soft, your swirls will smear when slicing.
Trim the edges before rolling. Even edges make a perfect spiral.
Use parchment to roll. It keeps the dough from tearing and helps create a tight log.
Don’t overbake. The cookies should be pale with just a hint of golden color underneath.