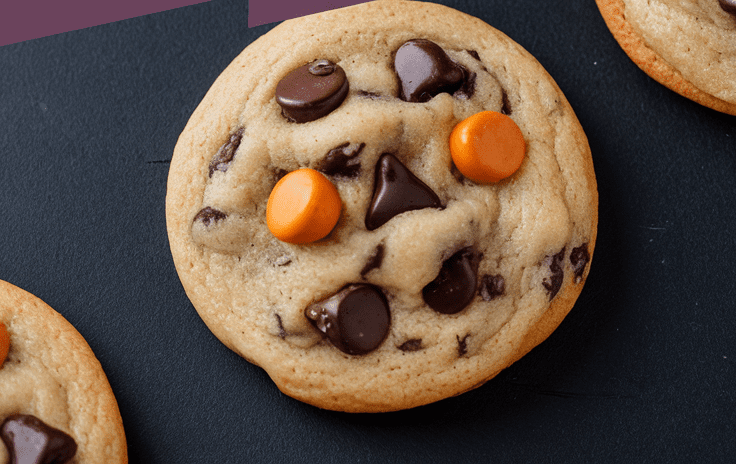
There’s something magical about baking cookies when the air turns crisp, pumpkins line doorsteps, and Halloween candy fills every store aisle. I’ve always believed that Halloween isn’t just about costumes and trick-or-treating—it’s about cozy kitchen moments too. And nothing captures that warm, spooky spirit quite like a batch of Halloween Chocolate Chip Cookies—golden, chewy, chocolatey, and dotted with pops of orange and black candy that practically scream “boo!”
These cookies are my go-to when I want something festive but easy. They start with a classic chocolate chip cookie base (buttery, rich, slightly crisp at the edges) and get a Halloween twist from colorful candies and dark chocolate chunks. Every bite is soft, melty, and loaded with spooky sweetness.
Why This Recipe Is Special
What makes these cookies stand out is how effortlessly fun they are. You don’t need fancy ingredients or complicated steps—just simple, familiar ones that turn into something magical. The dough is forgiving (even if you sneak a taste, I won’t tell), the cookies bake up beautifully every time, and you can customize them endlessly with Halloween candies or spooky sprinkles.
These are the kind of cookies that disappear before the tray cools. I make them every year for movie nights, trick-or-treat parties, and sometimes just because I need that nostalgic, buttery smell filling my kitchen.
Why You’ll Love This Recipe
- Festive and fun: The orange, black, and chocolate mix makes these perfect for Halloween parties or treat bags.
- Easy to make: No chilling required—just mix, scoop, and bake.
- Chewy perfection: Soft centers with crisp edges and melty chocolate bits.
- Customizable: Use M&M’s, candy eyes, or sprinkles to match your spooky theme.
- Kid-friendly: Great for baking with kids—they’ll love decorating the tops before baking.
Tools You’ll Need
You don’t need a fancy setup—just a few basics:
- Mixing Bowls: One large for the dough and one medium for the dry ingredients.
- Hand Mixer or Stand Mixer: Makes creaming the butter and sugar super easy. A whisk and elbow grease work too!
- Measuring Cups & Spoons: Accuracy matters when baking—especially for flour and sugar.
- Rubber Spatula: Perfect for scraping down the bowl and folding in the candies.
- Baking Sheets: Use two if possible so you can rotate batches. Line them with parchment paper for easy cleanup.
- Cookie Scoop or Tablespoon: Helps keep all cookies the same size for even baking.
- Wire Rack: Cool the cookies properly without overbaking from residual heat.
Ingredients
Makes: About 24 cookies
Prep Time: 15 minutes
Cook Time: 10–12 minutes
Total Time: 25 minutes
| Ingredient | US | Metric |
|---|---|---|
| All-purpose flour | 2 1/4 cups | 280 g |
| Baking soda | 1 tsp | 5 g |
| Salt | 1/2 tsp | 3 g |
| Unsalted butter, softened | 1 cup | 227 g |
| Brown sugar, packed | 3/4 cup | 150 g |
| Granulated sugar | 1/2 cup | 100 g |
| Large eggs | 2 | 2 |
| Pure vanilla extract | 2 tsp | 10 ml |
| Semi-sweet chocolate chips | 1 cup | 170 g |
| Halloween-colored M&M’s or candies | 1 cup | 160 g |
| Optional: Candy eyeballs or Halloween sprinkles | as desired | — |
Step-by-Step Instructions
- Preheat your oven to 350°F (175°C). Line your baking sheets with parchment paper. This keeps the cookies from sticking and gives them that perfect golden bottom.
- Mix the dry ingredients. In a medium bowl, whisk together the flour, baking soda, and salt. Set aside—this ensures even distribution later.
- Cream the butter and sugars. In a large bowl, beat the softened butter with both sugars until light and fluffy (about 2 minutes). This step adds air, giving the cookies a soft texture.
- Add eggs and vanilla. Beat in the eggs one at a time, followed by the vanilla extract. The dough should be smooth and creamy now.
- Combine wet and dry ingredients. Gradually add the flour mixture to the wet ingredients, mixing on low speed until just combined. Don’t overmix—this keeps the cookies soft instead of tough.
- Add the fun part. Stir in the chocolate chips and half of your Halloween candies. Keep the rest to press on top before baking—it makes them look bakery-style.
- Scoop and shape. Use a cookie scoop or tablespoon to drop dough balls onto the prepared sheet, about 2 inches apart. Press a few extra candies or candy eyes on top of each for that Halloween flair.
- Bake. Pop them in the oven for 10–12 minutes, until the edges are lightly golden but the centers look slightly underdone. They’ll firm up as they cool—trust the process!
- Cool and enjoy. Let them rest on the baking sheet for 5 minutes, then transfer to a wire rack. Your kitchen will smell like pure Halloween heaven.
Serving Ideas
- Serve them warm with a glass of cold milk or hot cocoa.
- Crumble one over vanilla ice cream for an instant Halloween sundae.
- Stack a few and wrap them in cellophane with ribbon for party favors.
- Add candy eyes after baking for a “monster cookie” look.
Variations and Customizations
- Monster Mix: Add peanut butter chips, pretzel pieces, or candy corn.
- Spooky Double Chocolate: Replace 1/4 cup flour with cocoa powder for a dark chocolate version.
- Gluten-Free Option: Swap in a 1:1 gluten-free baking flour.
- Vegan Version: Use vegan butter and flax eggs (1 tbsp ground flax + 2.5 tbsp water per egg).
Storage and Make-Ahead Tips
- Room temperature: Store in an airtight container up to 5 days.
- Freezing dough: Scoop dough balls, freeze on a tray, then transfer to a freezer bag. Bake straight from frozen—just add 2 minutes to bake time.
- Freezing baked cookies: Freeze in layers with parchment between them for up to 2 months. Thaw at room temp before serving.
Pro Tips & Mistakes to Avoid
Here’s what I’ve learned after countless cookie batches (and a few disasters):
- Use room-temperature butter—too cold and it won’t cream properly, too warm and cookies spread too much.
- Measure flour correctly: Spoon it into the cup, don’t scoop directly from the bag, or your dough will be dense.
- Don’t overbake: The cookies should look slightly soft in the middle—they’ll set as they cool.
- Reserve candies for topping: Press a few on top before baking to make them picture-perfect.
- Chill if it’s hot: If your kitchen is warm, chill dough for 15 minutes before baking to prevent spreading.
Nutrition (Per Cookie)
- Calories: 210
- Fat: 10 g
- Carbohydrates: 27 g
- Sugar: 18 g
- Protein: 2 g
Final Thoughts
These Halloween Chocolate Chip Cookies are more than just a treat—they’re a little piece of seasonal joy you can share with friends, family, or your inner child. They’re quick, comforting, and just spooky enough to bring smiles to any Halloween table.
So grab your mixing bowl, throw on a cozy sweater, and bake up a batch. And when you do, I’d love to hear how yours turned out—did you add candy eyes, sprinkles, or maybe a twist of your own? Share your creations and spread the Halloween cheer—one cookie at a time.
Halloween Chocolate Chip Cookies
24
minutes15
minutes210
kcalWhat makes these cookies stand out is how effortlessly fun they are. You don’t need fancy ingredients or complicated steps—just simple, familiar ones that turn into something magical. The dough is forgiving (even if you sneak a taste, I won’t tell), the cookies bake up beautifully every time, and you can customize them endlessly with Halloween candies or spooky sprinkles.
Ingredients
Directions
- Preheat your oven to 350°F (175°C). Line your baking sheets with parchment paper. This keeps the cookies from sticking and gives them that perfect golden bottom.
- Mix the dry ingredients. In a medium bowl, whisk together the flour, baking soda, and salt. Set aside—this ensures even distribution later.
- Cream the butter and sugars. In a large bowl, beat the softened butter with both sugars until light and fluffy (about 2 minutes). This step adds air, giving the cookies a soft texture.
- Add eggs and vanilla. Beat in the eggs one at a time, followed by the vanilla extract. The dough should be smooth and creamy now.
- Combine wet and dry ingredients. Gradually add the flour mixture to the wet ingredients, mixing on low speed until just combined. Don’t overmix—this keeps the cookies soft instead of tough.
- Add the fun part. Stir in the chocolate chips and half of your Halloween candies. Keep the rest to press on top before baking—it makes them look bakery-style.
- Scoop and shape. Use a cookie scoop or tablespoon to drop dough balls onto the prepared sheet, about 2 inches apart. Press a few extra candies or candy eyes on top of each for that Halloween flair.
- Bake. Pop them in the oven for 10–12 minutes, until the edges are lightly golden but the centers look slightly underdone. They’ll firm up as they cool—trust the process!
- Cool and enjoy. Let them rest on the baking sheet for 5 minutes, then transfer to a wire rack. Your kitchen will smell like pure Halloween heaven.
Notes
- Use room-temperature butter—too cold and it won’t cream properly, too warm and cookies spread too much.
Measure flour correctly: Spoon it into the cup, don’t scoop directly from the bag, or your dough will be dense.
Don’t overbake: The cookies should look slightly soft in the middle—they’ll set as they cool.
Reserve candies for topping: Press a few on top before baking to make them picture-perfect.
Chill if it’s hot: If your kitchen is warm, chill dough for 15 minutes before baking to prevent spreading.